myFlix Project

Overview

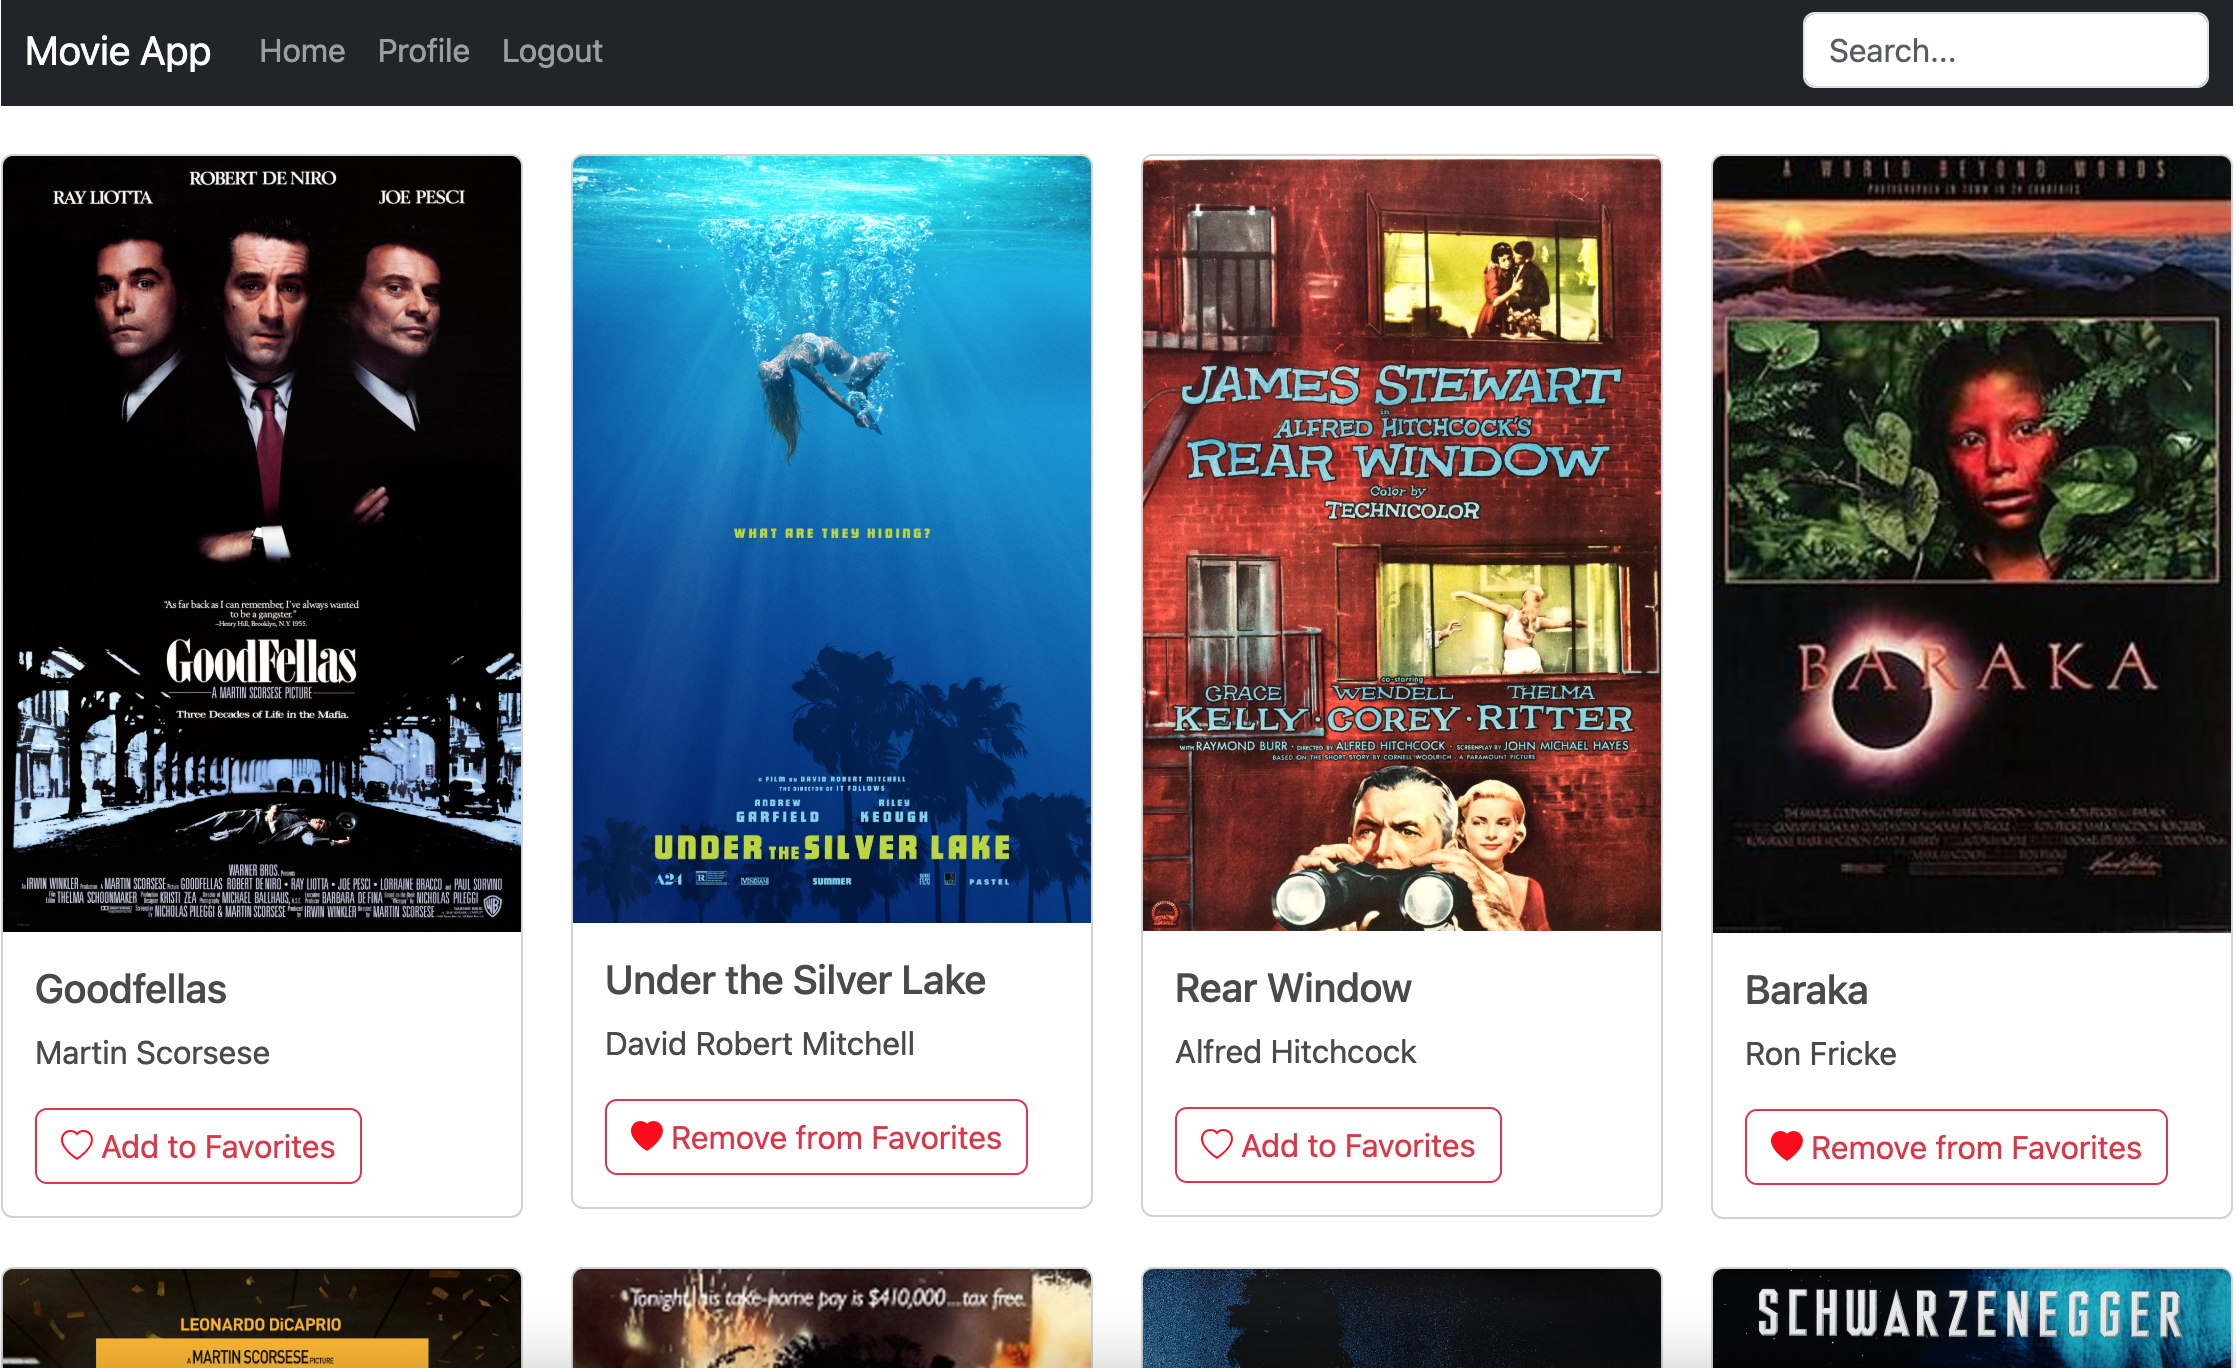
myFlix is a web application developed using the MERN stack (MongoDB, Express, React, Node.js). It provides users with information about movies, directors, and genres, along with the ability to create accounts, update their profiles, and maintain a personalized list of favorite movies.

Purpose & Context

This project was part of my CareerFoundry web development course, designed to demonstrate my abilities in full-stack JavaScript development. The goal was to create a dynamic, user-focused application that highlights my technical skills and problem-solving abilities.


Objective

The primary aim was to develop both the server-side and client-side of the application. This ambitious project was intended to showcase my capabilities in full-stack development while solving the challenge of integrating various features into a cohesive application.


Approach

Server-Side

  • Built a RESTful API using Node.js and Express.

  • Designed and implemented CRUD operations to interact with a MongoDB database, providing JSON-formatted responses.

  • Secured the API with JWT-based authentication and authorization mechanisms.

  • Extensively tested endpoints with Postman to ensure functionality and reliability.

Client-Side

  • Developed a responsive, single-page application using React and React-Bootstrap.

  • Designed multiple user-friendly views:

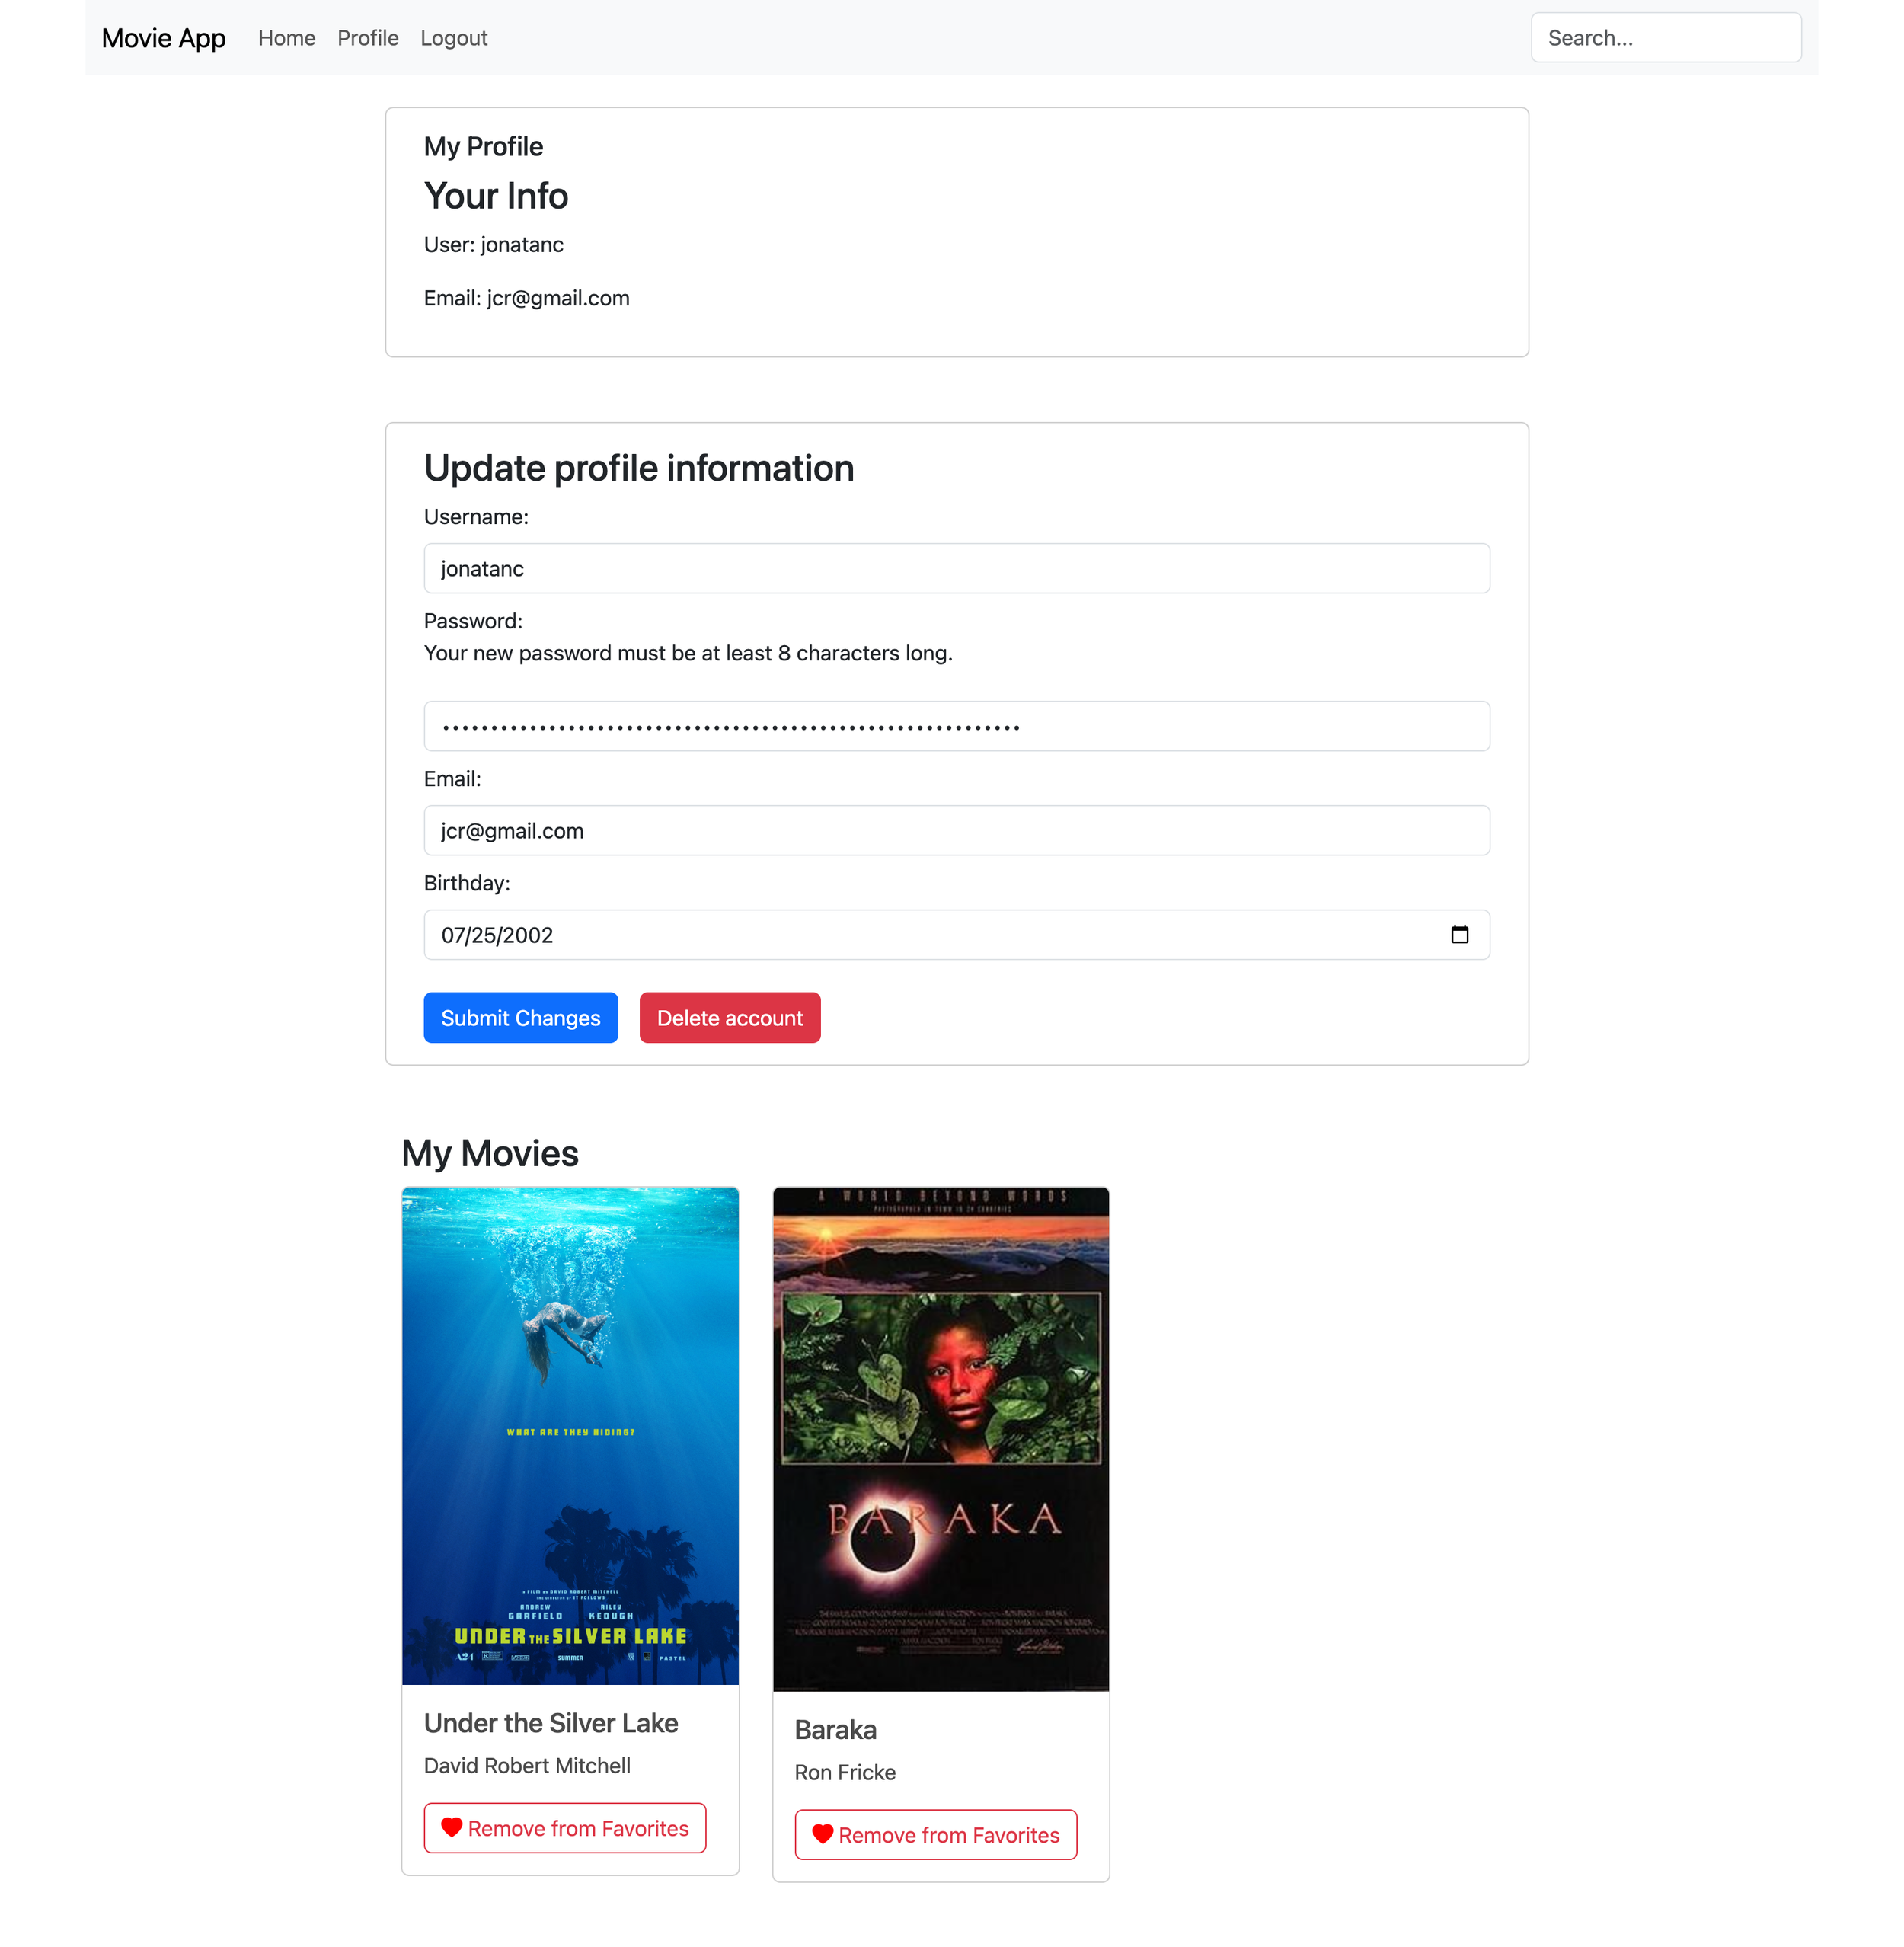
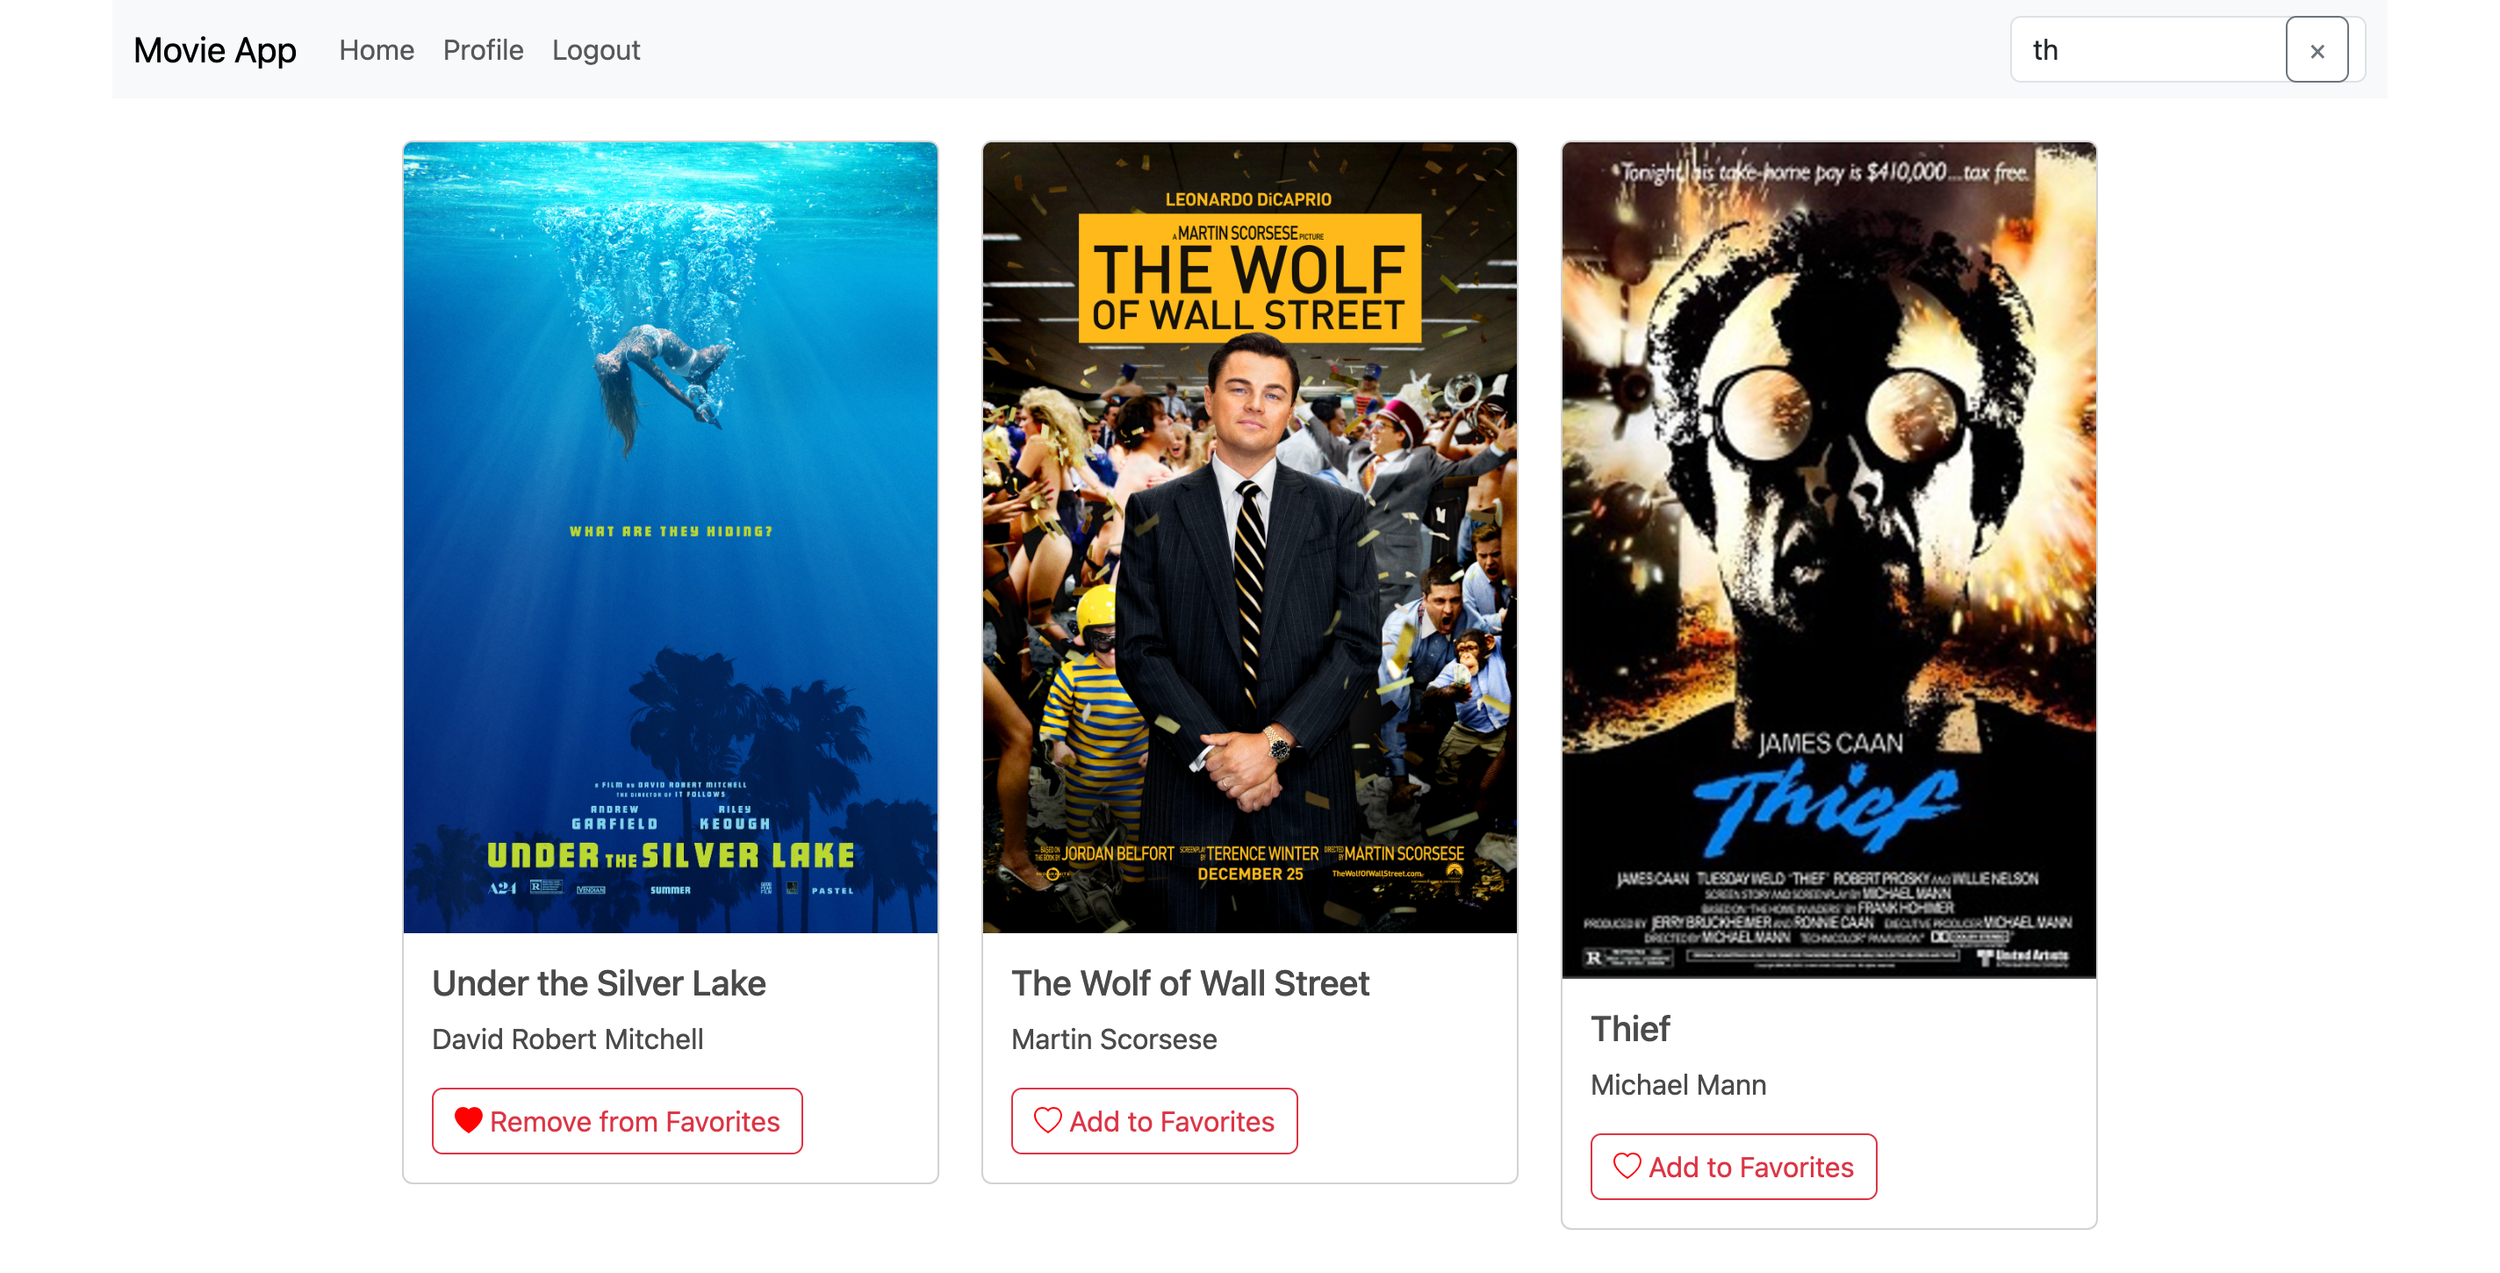
    • Main View: Displays a list of all movies with a search feature to find a movie by title..

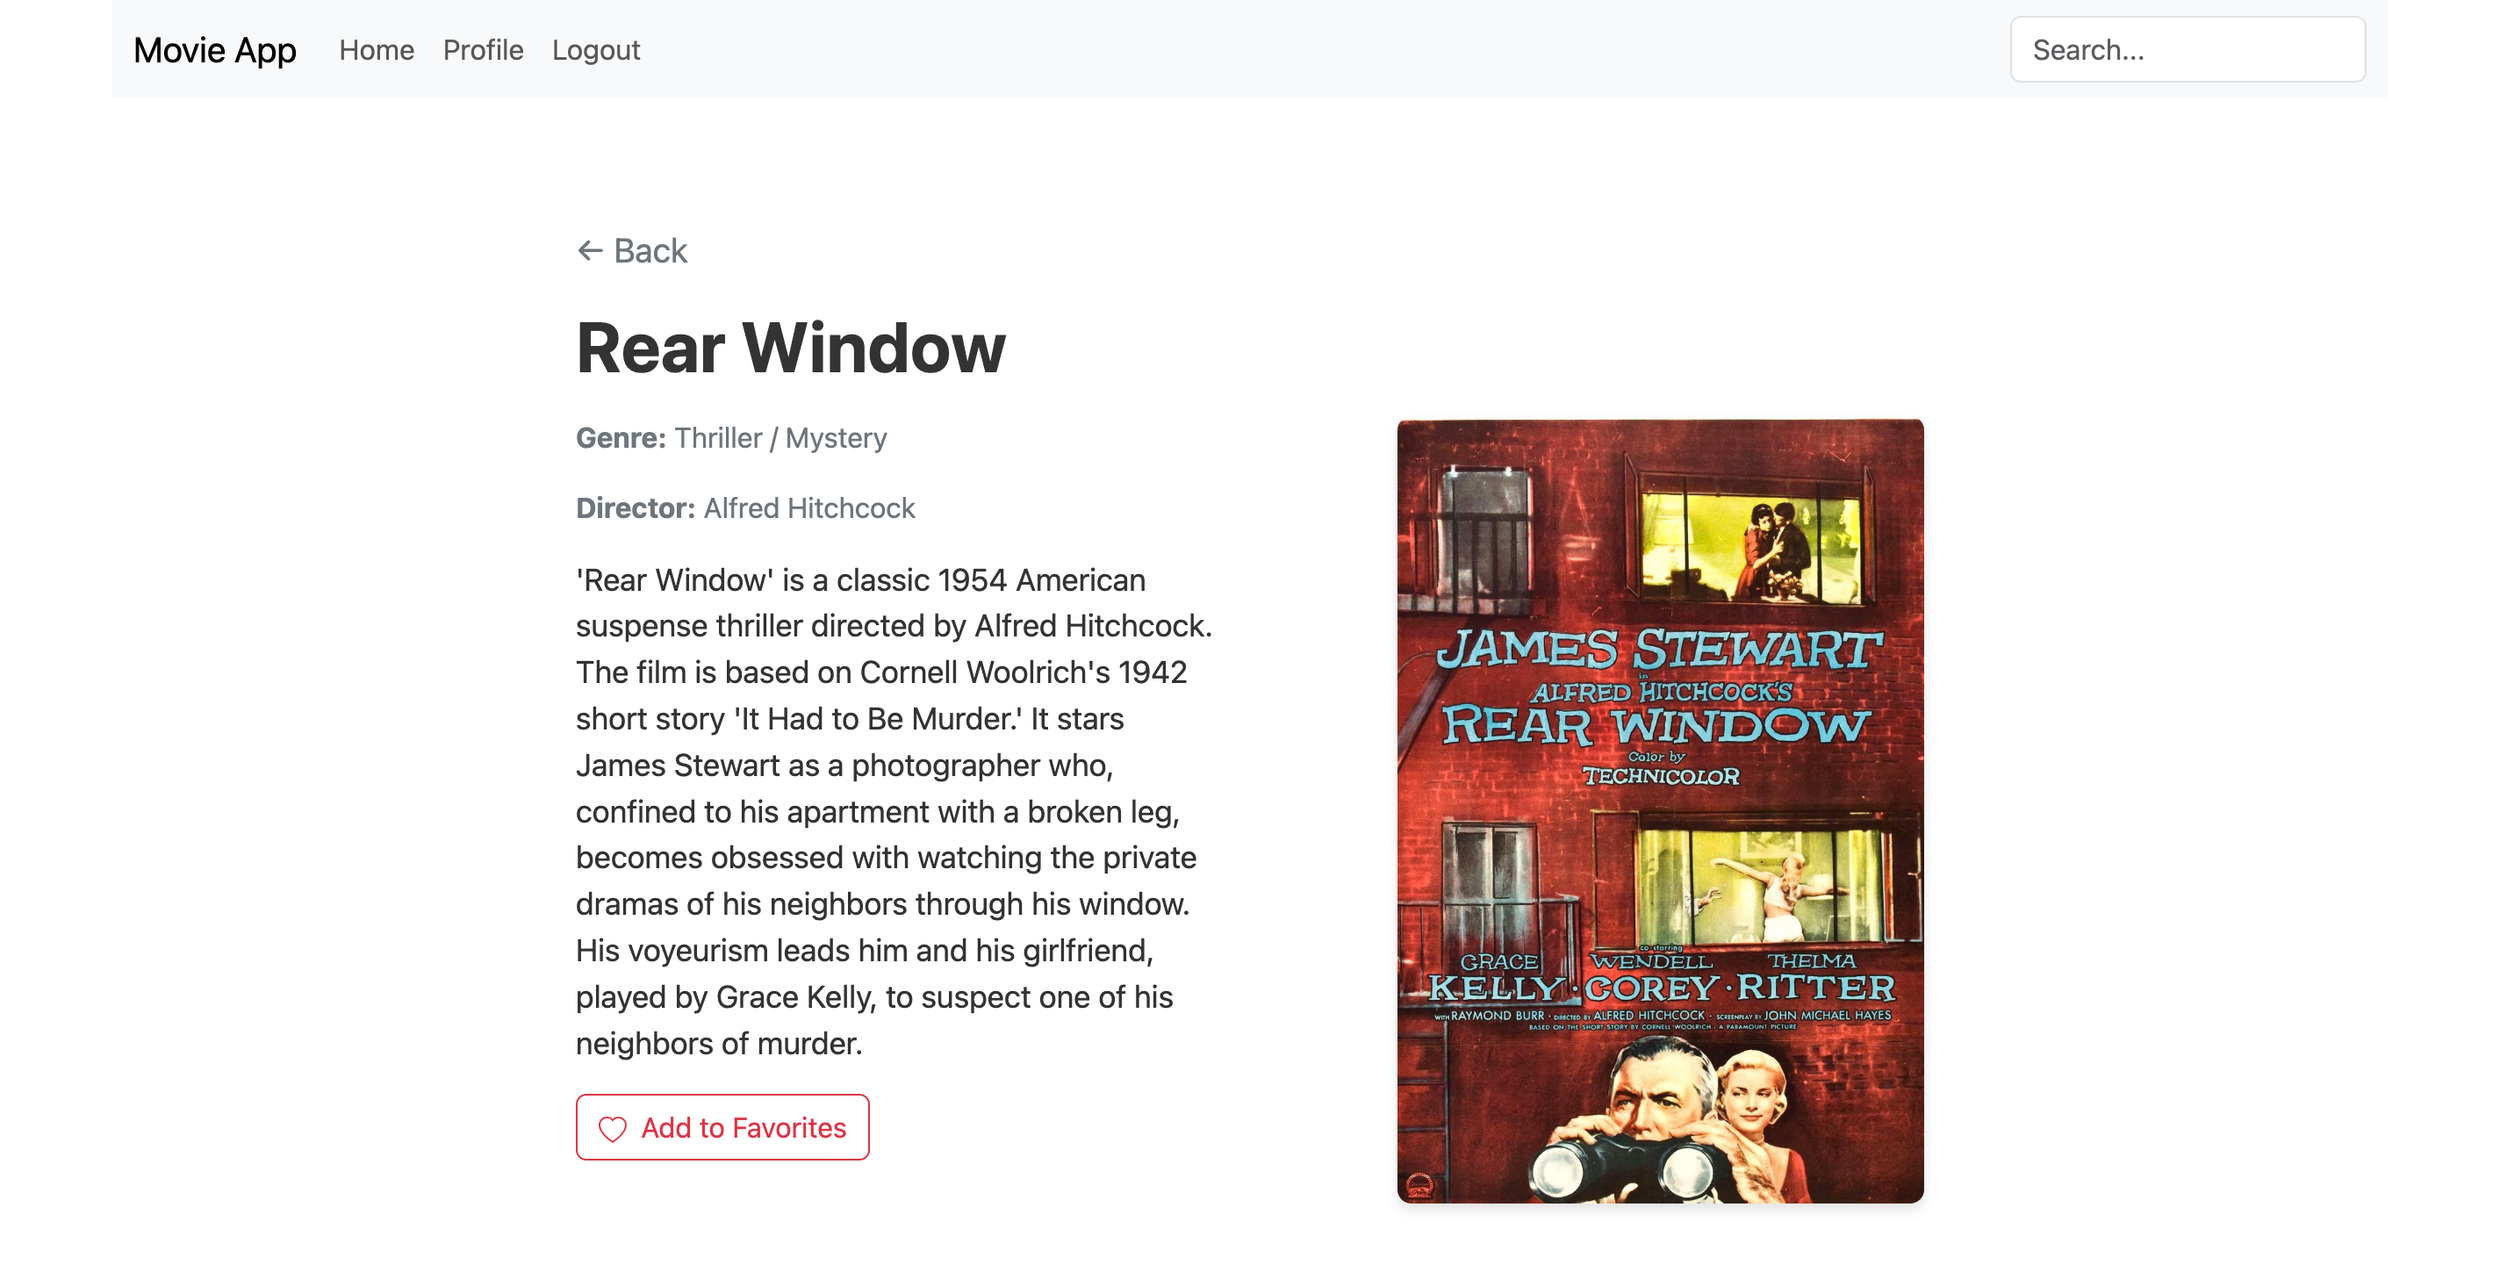
    • Movie Detail View: Shows details about a single movie with options to add or remove it from the favorites list.

    • Login View: Enables user authentication.

    • Registration View: Allows new users to create accounts.

    • Profile View: Lets users update personal details and manage their favorite movies.

  • Implemented state management using React Hooks for cleaner and more maintainable code.


Challenges & Key Learnings

  1. Data Flow and Component Architecture in React

The Challenge: Initially, structuring the flow of data between parent and child components led to unexpected rendering and state update issues. The complexity came from juggling multiple views (e.g., Main View, Movie Detail View, and Profile View) that each needed data from the API in slightly different formats.

How I Addressed It:

  • Discussed debugging and problem-solving strategies with my tutor..

  • Used the React Developer Tools to trace the state and props flow in real time.

  • Restructured components so that data fetching occurred at a higher-level parent component, reducing repeated network calls and ensuring consistent data availability.

What I Learned:

  • The importance of having a clear “data flow map” that shows which components own particular pieces of state.

  • How to leverage React Hooks (mainly useState and useEffect) more effectively to manage and propagate data.


  1. Integrating Authentication and Authorization

The Challenge: Incorporating JWT-based authentication was my first time handling secure routes in a React application while using a custom-built Node/Express API. Ensuring token validity, handling token expirations, and differentiating between authorized/unauthorized states required a cohesive strategy across both client and server.


How I Addressed It:

  • Studied official Express and JSON Web Token documentation, experimenting with token-based middleware to validate user sessions on the server side.

  • Created a higher-order component (HOC) on the client side to guard certain routes, ensuring only authenticated users could access them.

  • Implemented robust error handling and user notifications to improve the user experience around login/logout states.

What I Learned:

  • Best practices around storing JWTs (e.g., avoiding localStorage if possible) to mitigate security vulnerabilities.

  • The value of clear error messages and redirection strategies to maintain good UX when a token is invalid or expired.


Duration

Completing the project took significantly longer than other assignments due to the complexity of full-stack development. The server-side was completed within a few weeks, but the client-side required additional time to fine-tune features, enhance responsiveness, and troubleshoot challenges.


Cowrie SSH Honeypot + Splunk Monitoring


Project Objective

After taking a course on cybersecurity I wanted to see firsthand what kind of threats were present out in the wild of the internet. Was it full of the dangers I was led to believe?

The goal was to build an internet-facing SSH honeypot that could safely capture unsolicited connection attempts, credential guessing, and commands entered after a simulated compromise. This would allow me to see how many attackers are out there and the methods they are using when they find a host to attack. The project also created an end-to-end monitoring pipeline so Cowrie JSON events could be analyzed in Splunk rather than reviewed only from local log files.


Architecture and Security Design

I set up Cowrie, an open source SSH and Telnet honeypot on an Ubuntu VPS hosted by DigitalOcean. Since SSH normally uses port 22, I moved the server’s real SSH connection to port 2222 and left port 22 open for the honeypot. This meant anyone scanning the server and trying to connect over the standard SSH port would reach my honeypot instead of the real SSH service.

Cowrie recorded the activity it received as JSON logs. I used the Splunk Universal Forwarder to send those logs to Splunk through port 9997, where I could analyze the activity.

• Internet → Port 22 → Cowrie SSH honeypot

• My Admin Connection → Port 2222 → Real SSH

• Cowrie logs → Splunk Universal Forwarder → Port 9997 → Splunk dashboards


Deployment and Troubleshooting

Port separation

I checked the open ports to make sure that Cowrie was running on port 22 while my real SSH connection was still on port 2222. This kept the honeypot separate from the connection I used to manage the server.

Figure 1. Cowrie on port 22 and administrative SSH on port 2222.


Troubleshooting a privileged-port failure

When I first set up Cowrie, it couldn't run on port 22 because of a permissions error. I had to troubleshoot the Linux permissions and configuration to get it working. Once I fixed the issue, I checked the ports again to make sure Cowrie was running on port 22 and my real SSH connection was still available on port 2222.

Figure 2. Verification that the real SSH service is listening on port 2222, keeping administrative access separate from the Cowrie honeypot on port 22.


Splunk Log Pipeline

Next, I needed a way to get the activity Cowrie was recording into Splunk so I could actually analyze it. I installed the Splunk Universal Forwarder on the honeypot server and had it send Cowrie’s logs to Splunk over port 9997.

After setting that up, I checked the forwarder to make sure it was connected to Splunk. I also tested port 9997 to confirm that the honeypot server was communicating with the Splunk receiver.


Figure 3. Active forwarding target and successful TCP/9997 connectivity test.


Cowrie saved the activity it captured as JSON data, including information like the attacker’s IP address, which ports were being used, when the activity happened, and what type of event occurred. As a JSON file, the data was difficult to parse. Once this data was sent to Splunk, I could search and filter the activity to figure out exactly what kind of interactions my honeypot was having and what attackers were trying to do after connecting.


Figure 4. Raw Cowrie JSON event data collected by the SSH honeypot before ingestion and analysis in Splunk.


Analysis Results

Activity over time

The timeline gave me an overview of how much activity the honeypot was receiving each day. The biggest spike came on August 8 when Cowrie recorded 261,789 events. It should be noted that these are not necessarily separate attacks but individual events, so multiple events could come from a single interaction with the honeypot.

Throughout this analysis, references to “attackers” can include automated bots and scanning tools in addition to people manually interacting with the honeypot. Similarly, a successful login only means that someone successfully entered Cowrie’s simulated environment, not that they gained access to the real server. Cowrie allows most attackers to enter so their attack patterns can be observed

Figure 5. The Attack Timeline showing a peak on August 8, 2026.


Source concentration

There was a heavyweight among the crew of attackers. 168.90.65.197 generated 227,313 Cowrie events, by far the most of any IP during the week. That one IP accounted for a massive amount of the overall activity received by the honeypot.

Figure 6. Top Source IPs. 168.90.65.197 has by far the highest volume.


usernames

When it came to usernames attackers chose for themselves “root” was by far the most popular. There were 34,692 attempts using “root” compared to the next most popular, “admin” which only had 782 attempts. This is consistent with research from the SANS Internet Storm Center which found “root” made up 48.49% of username attempts observed in their research.

Figure 7. Top three usernames chosen by attackers.


Command execution

Looking at the commands attackers ran showed what attackers did once they thought they had logged in.

The most common command was echo -e "\x6F\x6B", which was run 29,624 times. All this command does is print “ok” using hexadecimal characters. This may have been a quick check to see if the system is responding to interactions correctly.

The next two most common commands were uname -s -v -n -r -m and uname -a. The first asks for details like the operating system/kernel name, kernel version and release, hostname, and hardware architecture. uname -a is basically a quicker way of asking for most of the same information. This helps an attacker learn what kind of machine they are interacting with and decide what they want to do next.

Figure 8. A recent simulated login followed immediately by a uname command, demonstrating post-login interaction capture.


Notable Finding: Automated Host Reconnaissance

The most notable command I captured was a long shell script that gathered a large amount of information about the system. It checked the OS, CPU architecture and model, uptime, number of processors, available shell tools, and GPU hardware. Something that stood out to me was that it specifically checked whether the system had VGA or NVIDIA devices.

Figure 9. The full command which searched for OS, CPU architecture and model, uptime, number of processors, available shell tools and GPU hardware. It also specifically checked to see if the device had a VGA or NVIDIA GPU.

One possible reason for this is cryptojacking, where an attacker could be looking for powerful GPUs to use for cryptocurrency mining. However, there could be other reasons for checking the hardware as well. The script may have simply been trying to figure out what kind of system it had reached and what type of malware or payload would work on it.


Key Takeaways

At the beginning of this project, one of my biggest questions was: are there really that many attackers out there? My answer after running the honeypot is a resounding yes.

Almost immediately, attackers and automated bots began interacting with it. Before long, I was seeing thousands of attempts to connect, log in, gather information, and interact with the system.

I already knew from my cybersecurity studies that automated attacks and scans are constantly happening across the internet, but this was the first time I got to see that activity firsthand. Seeing the volume of activity coming into my own honeypot made the scale of what is happening every second we’re online feel much more real.


 Water Treatment Lab

An OT/ICS cybersecurity lab using OpenPLC, Ignition, Modbus/TCP, Kali Linux, Wireshark, and UFW

Since beginning my studies in cybersecurity I have been fascinated by learning about security for critical infrastructure and specifically, water security. There is nothing more important to communities than access to a clean, reliable water supply and the fact that some water systems are vulnerable to cyber attacks is viscerally frightening to me. In addition, the news that Iran had attempted to hack US water systems recently made me feel this was more urgent than ever.

I wanted to see how an attack could affect a water treatment plant firsthand, so I set up my own water treatment plant and attacked it.

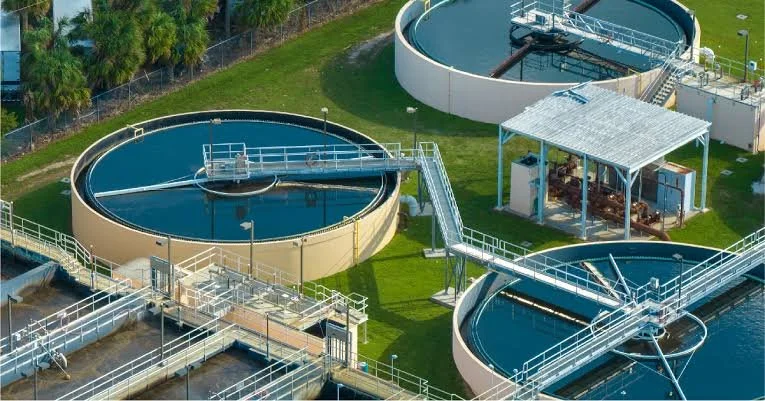
Nice Water Treatment Plant. I hope nobody hacks it for educational purposes.


What I built

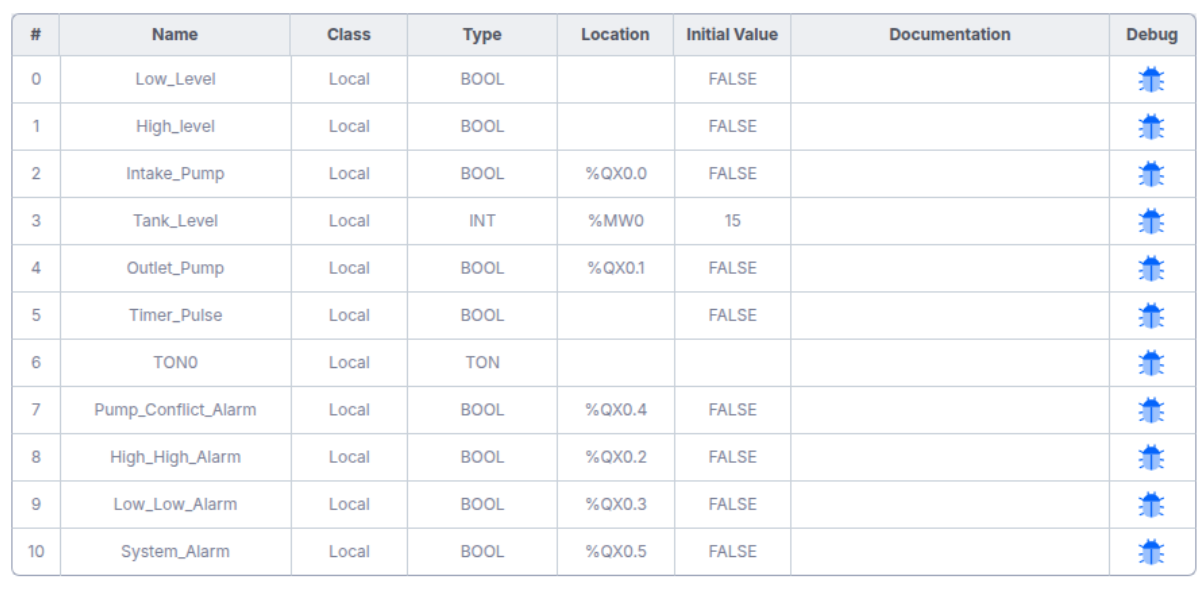
I studied on RealPARS how to construct a basic water treatment plant in OpenPLC on my Ubuntu virtual machine. This included elements such as an intake pump, outlet pump, tank filling and draining simulations, time logic, alarms for high/low levels, a pump conflict alarm and a general system alarm. I constructed it using a ladder diagram in OpenPLC.

I set a rule that the tank would fill up using the intake pump until it reached 80% full and would then drain using the outlet pump until reaching 20% full. The process would then repeat indefinitely. 

After building out the control logic in OpenPLC I used Ignition to create a Human-Machine Interface which allowed me to monitor all the states in one place.

I set up a Kali VM to act as the attacker, we will get to that more later.

OpenPLC runs the control logic. Ignition provides the HMI so I can watch the tank, pump states, alarms, and tank-level history. The Kali Linux VM acts as the attacker/security-testing machine, and Wireshark lets me capture and inspect the Modbus/TCP traffic.


PLC Variables and Input/Output Mapping


Tools used

  • OpenPLC 

  • Ignition HMI/SCADA

  • Modbus/TCP 

  • Kali Linux 

  • mbpoll 

  • Wireshark 

  • Ubuntu 

  • UFW 

  • VMware Fusion


Making the process behave like a plant

Before I could attack the plant I needed to set a predictable baseline state. I set a rule that the tank would fill up using the intake pump until it reached 80% full and would then drain using the outlet pump until reaching 20% full. The process would then repeat indefinitely. 

 
PLC Logic

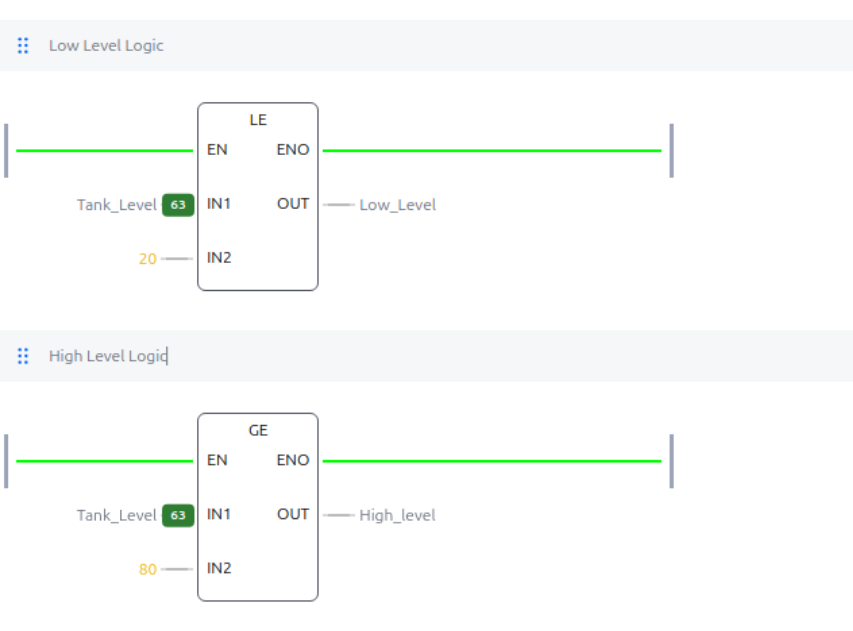
OpenPLC low- and high-level detection. Tank_Level <= 20 sets Low_Level; Tank_Level >= 80 sets High_Level.


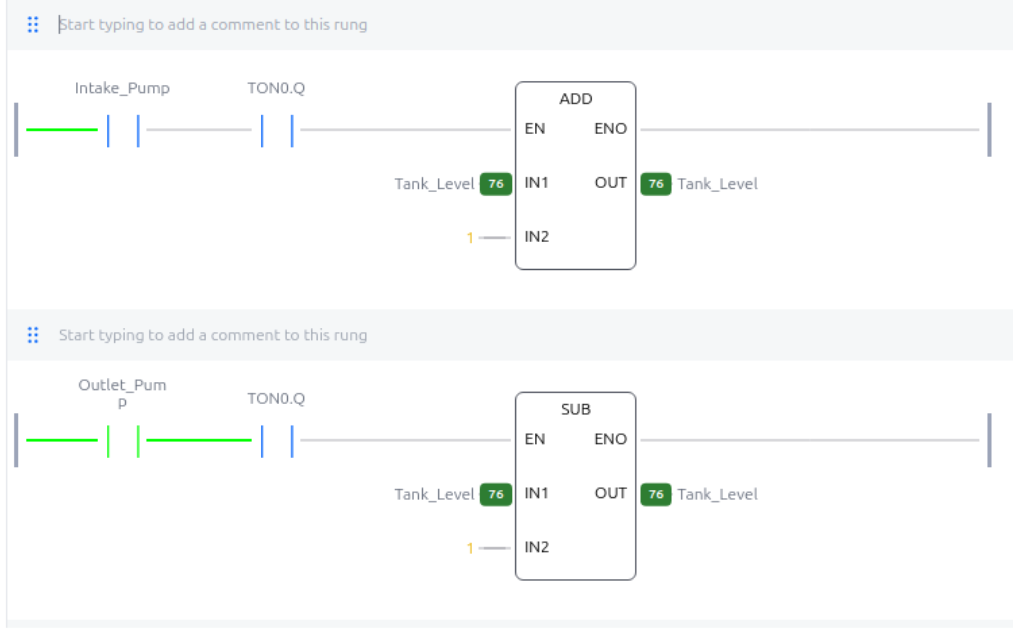
Tank fill and drain simulation rungs

Tank Fill Simulation and Tank Drain Simulation rungs. These model the physical effect of the two pumps on Tank_Level.


Establishing a baseline

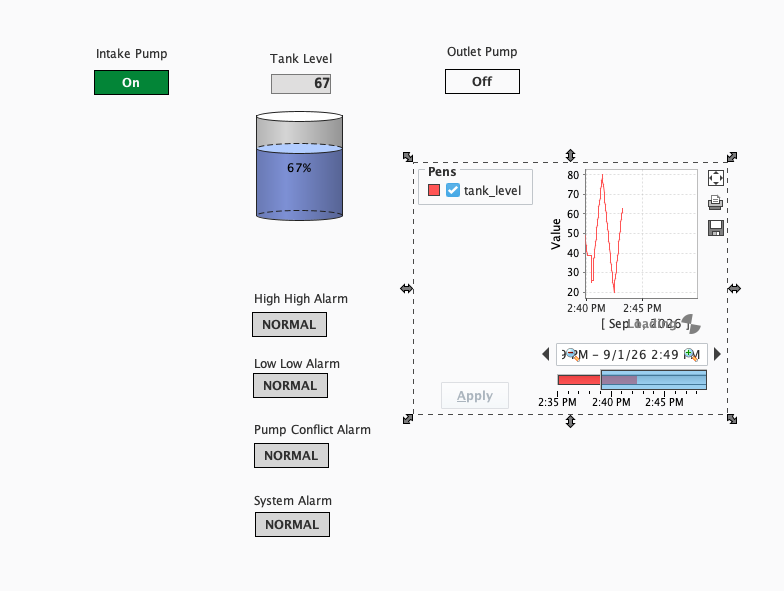
Once I had everything working I observed several cycles to make sure everything worked as expected. The tank fluctuated between 20% and 80% with one pump working at a time. No alarms were triggered. I checked between Ignition and OpenPLC to ensure they were getting the same readings.

 
Ignition HMI

The Ignition HMI during normal operation: one pump running, the other off, alarms normal, and the tank level cycling.


Then I tested the weak point: Modbus access

After all the setup I got to the fun part: the attack!

I began with reconnaissance. I used mbpoll, a command-line Modbus client from my Kali VM to query the Modbus/TCP service on the Ubuntu VM. I used Wireshard to inspect the Modbus traffic between the VMs. I monitored the tank levels and viewed which pump was on at which time. I confirmed the information I was getting was accurate in the Ubuntu VM. 

Once I was confident that I was viewing the correct information about the water treatment plant it was time to go on the offensive. I used mbpoll to send a Modbus register write that would immediately change the tank value to 60. This confirmed that I was able to modify the data. 

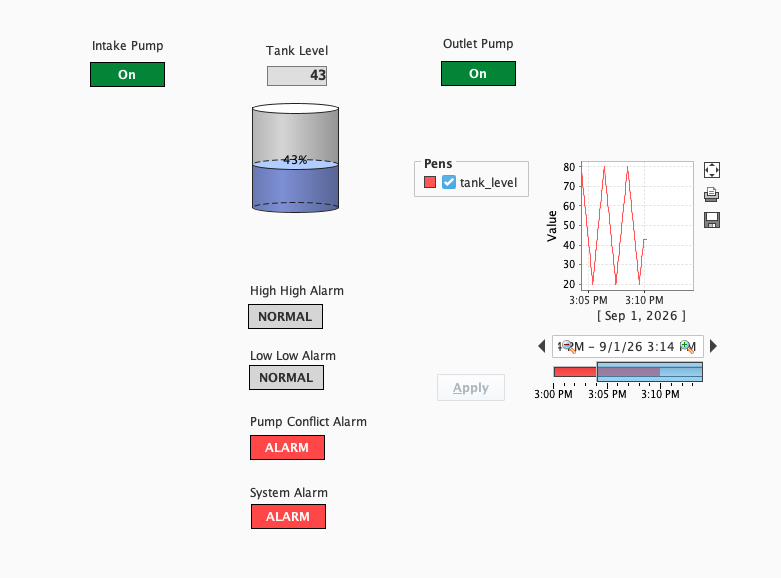
After confirming I could modify the tank level, I wanted to see if I could trigger alarms. I wrote a value of 95, above the high-threshold I had set. The PLC responded to my manipulated value and as a result both pumps were activated simultaneously, triggering the Pump Conflict and System alarms.

The system was going haywire. A simple Modbus write had disrupted the intake/outlet process.


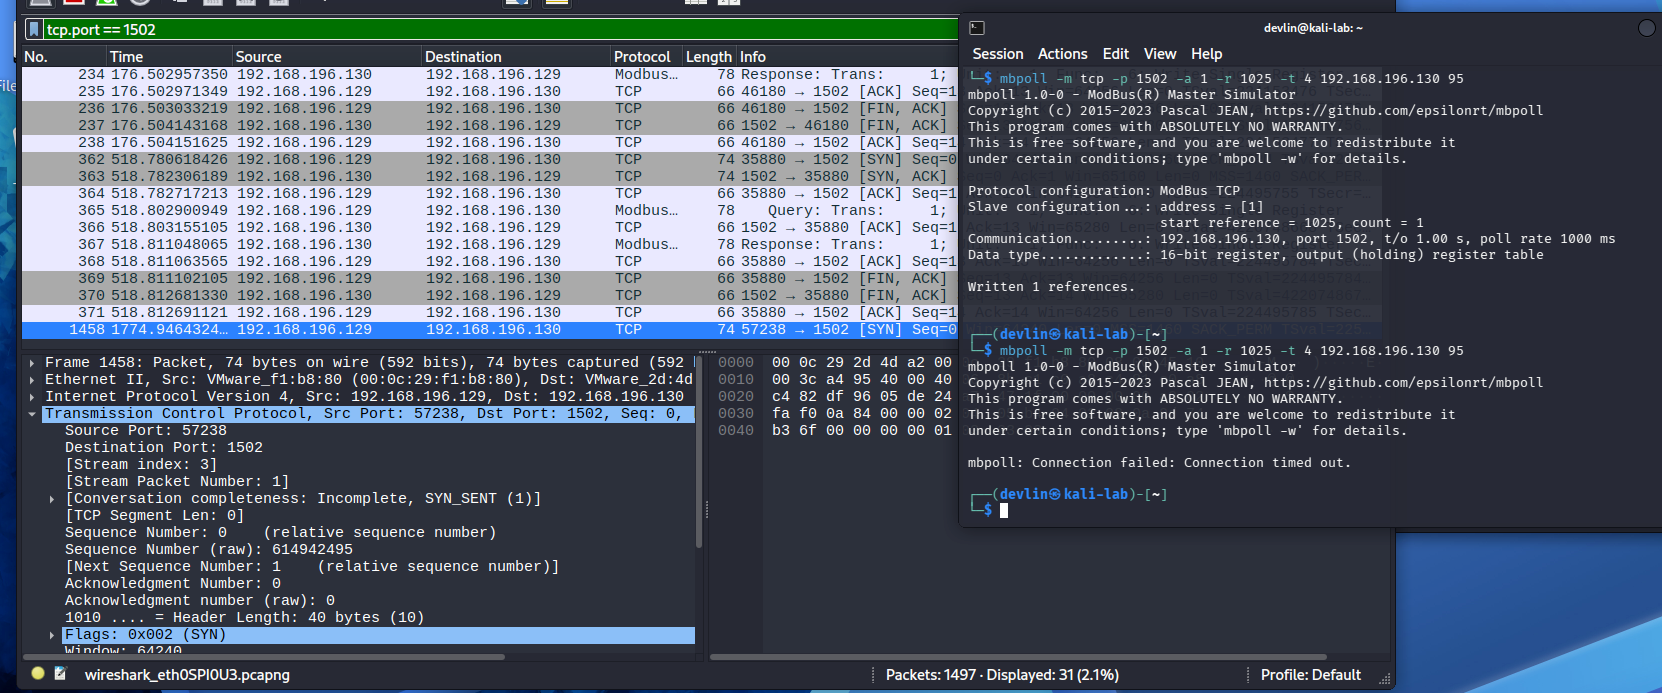
Wireshark and the controlled Modbus register-write test. The write changed the simulated Tank_Level before the PLC logic resumed control.


The abnormal state was visible immediately: both pumps were on and the Pump Conflict and System alarms were active.


Recovery and mitigation

After the successful attack, I returned the system to a normal state and verified in OpenPLC that everything was running smoothly. The tank began cycling normally again, filling up and then draining with one pump active at a time with no alarms triggered.

The security issue was that the Kali VM could access the Modbus service and issue write requests without authentication. Because the PLC accepted the request network access became control access.

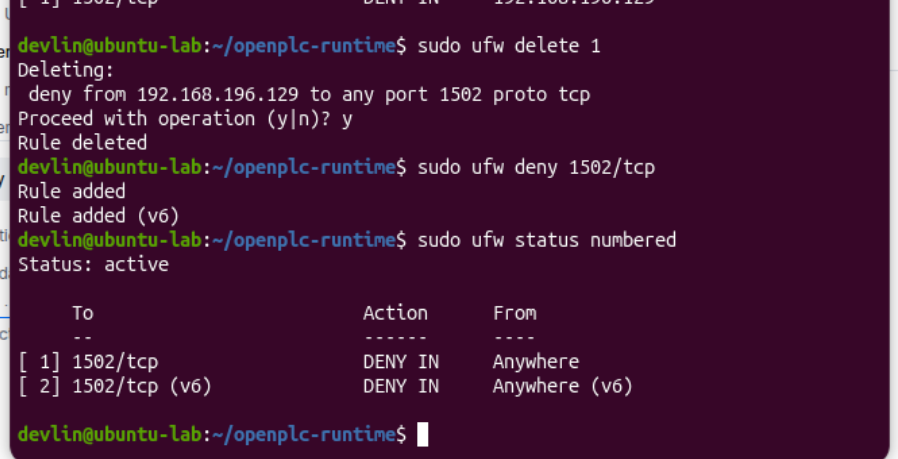
To prevent future attacks I added rules banning the 1502 port that the Kali VM used to attack the plant and denied all incoming traffic to the system.

To prevent similar future attacks I used UFW on the Ubuntu VM to block inbound TCP connections to port 1502, where the OpenPLC Modbus/TCP service was listening.

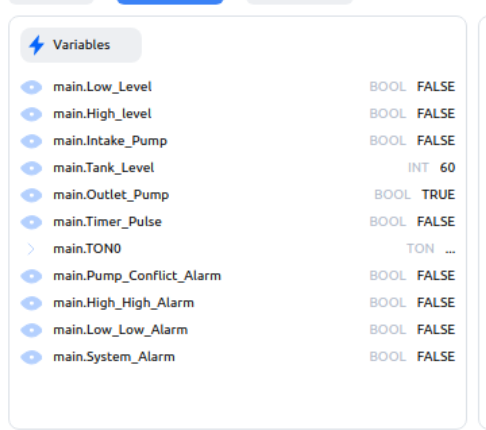
OpenPLC after recovery: Tank_Level is changing again, only the outlet pump is active, and the alarm outputs are false.


UFW blocking inbound access to the OpenPLC Modbus/TCP service on port 1502.


Did the mitigation actually work?

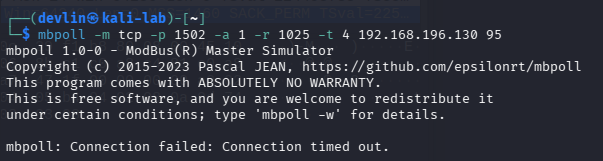
To test the effectiveness of my firewall I tried executing the same command from my Kali machine that had made my treatment plant go haywire previously. Instead of messing with my plant, I got a quick Connection failed message. The firewall was effective in blocking my attacker (me).

After mitigation, the Modbus request from Kali times out instead of reaching OpenPLC.


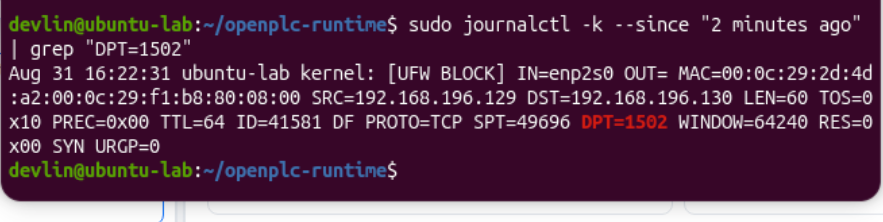
The Ubuntu firewall log records the blocked connection attempt to TCP/1502.


Lessons learned

  • In OT security, a network event can translate into a process change. That makes understanding the normal physical/process state just as important as understanding the packets.

  • A baseline made the attack easier to recognize. I knew what the pumps, tank level, trend, and alarms should look like before I changed anything.

  • Industrial protocols such as Modbus/TCP need protection around them. Limiting which systems can reach the PLC dramatically reduced the attack surface in this lab.

  • Detection is more useful when network telemetry and process telemetry can be viewed together. Wireshark showed the command; Ignition showed the consequence.

  • Recovery matters as much as blocking the attacker. I verified that automatic control had actually resumed rather than assuming the process was fixed.


Next steps

I am going to continue developing this lab. My next steps will be to create network segmentation, more realistic allowlisting and improve OT specific monitoring and alerting.

For this proof of concept, I blocked all inbound access to TCP/1502. In a real OT environment, simply blocking the service would likely interfere with legitimate communications, so a better approach would be to allow only authorized HMI/engineering systems to communicate with the PLC.

Screenranker

The Proposal

Screenranker is an e-commerce platform for creators to sell the screen rights to their intellectual property. Adapted IP is increasing in popularity, proven to be a better/safer ROI for producers, and there is yet to be a robust ecommerce solution that helps facilitate sale and search of this type of content. The founders are entertainment industry professionals who believe that this is the natural next step in content acquisition.


Key objective

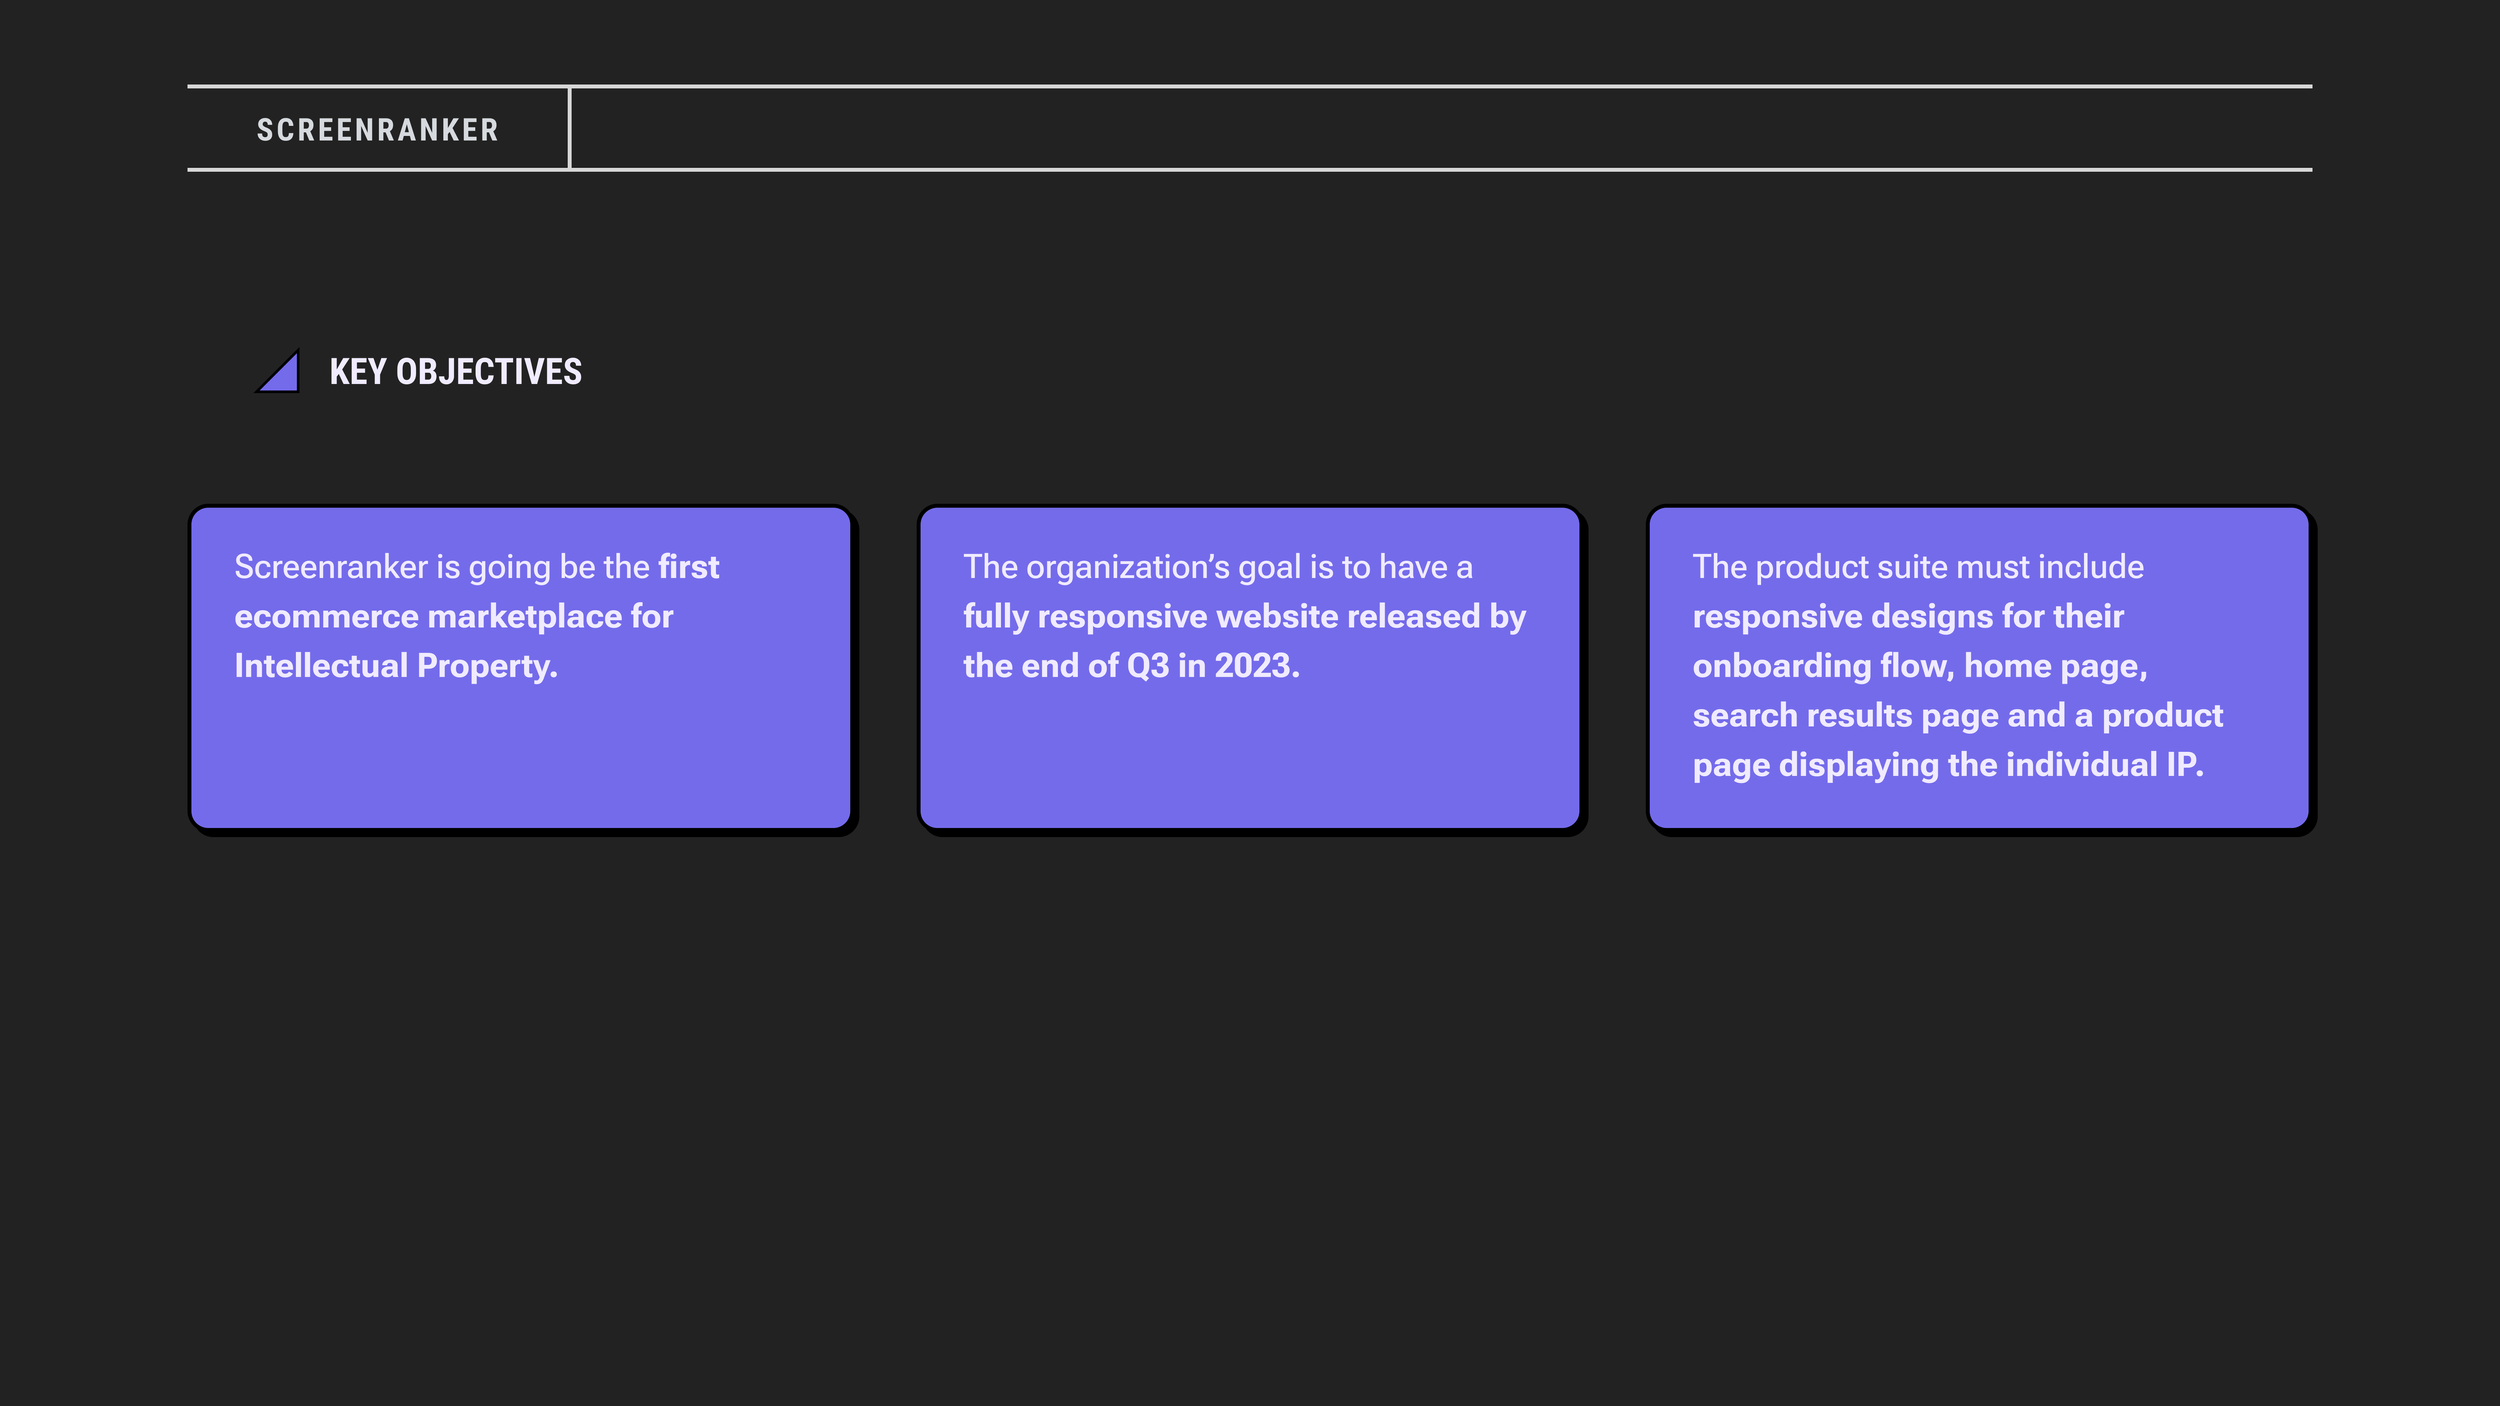
Screenranker is going be the first ecommerce marketplace for Intellectual Property. This includes the sale of rights or ownership to any of the following: Books, Podcasts, Stage Plays, Documentaries, Video Games, Merchandise and Journalism.

The organization’s goal is to have a fully responsive website released by the end of Q4 in 2023.

The product suite must include responsive designs for their onboarding flow, home page, search results page and a product page displaying the individual IP.


Solution

Working with the founders and a technical team, I researched and designed a full e-commerce platform for acquiring intellectual property.


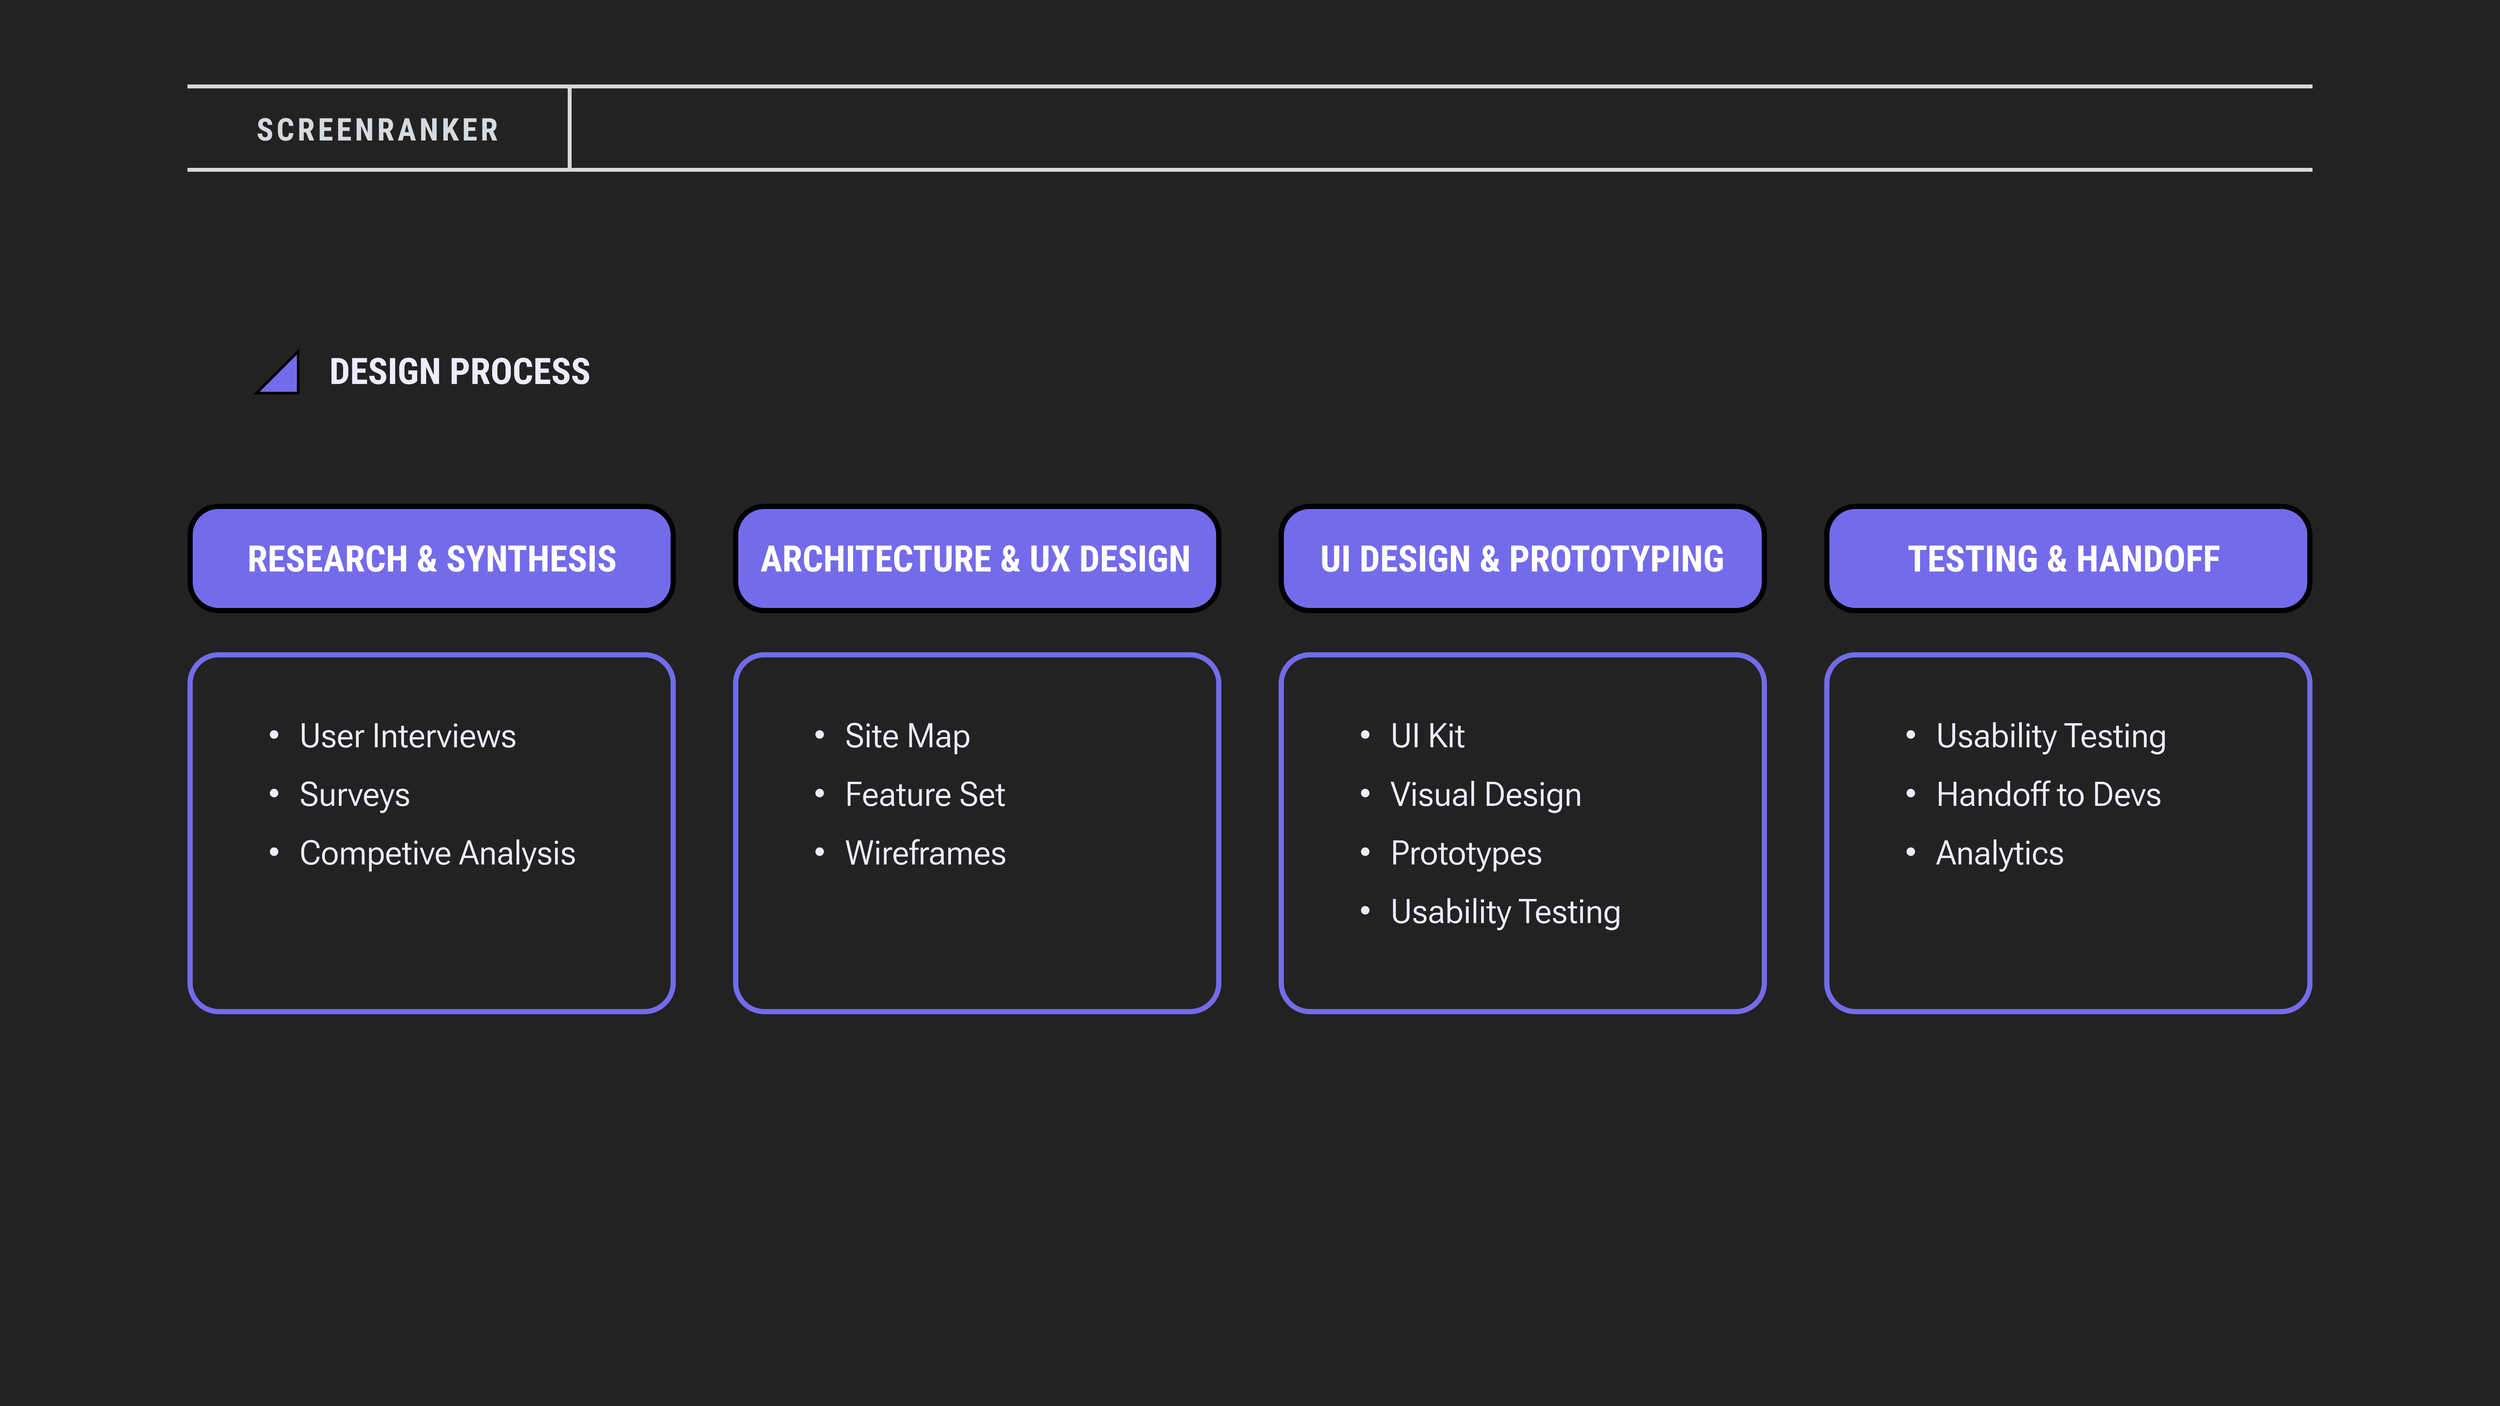
Design Process

  • Research & Synthesis

  • Architecture & UX Design

  • UI Design & Prototyping

  • Testing & Handoff


Research

The first step in our research was coming up with our goals.

  • Is buying/selling intellectual property a problem for for those trying to do it?

  • How does the process work for most people?

  • What works well and what does not work about the process of acquiring IP?

  • What information is needed for buyers to make the right decisions?


Market Research findings

  • The market for IP has recently undergone a radical shift. While in previous decades the buyers for IP were generally limited to the major studios that number has gone up dramatically with the proliferation of streaming services, production companies and smaller independent studios.

  • While more movies are not necessarily getting made, the amount of IP being purchased or optioned has increased dramatically.

  • Adapted IP is increasing in popularity, proven to be a better/safer ROI for producers, and there is yet to be a robust ecommerce solution that helps facilitate sale and search of this type of content.

  • The Blacklist, which is a website where screenwriters pay to post their original scripts online, has become enormously successful. This is despite the finding that most original scripts are a far less valuable commodity than known IP. Producers see IP as content with a built-in market while making a film based on an original film is far more of a gamble.

  • On the seller side, we found that creators ultimate goals are to have their work adapted. Very few books or other content make very much money but if their work can be adapted they are paid from that and given more exposure.


Competitive analysis

Key Takeaways

  • As of now there is no central location for selling intellectual property. Publisher’s Marketplace seems to be the most popular but advertising IP is mostly decentralized among social media and scattered marketplaces.

  • Most sites for advertising IP are medium specific and books are the only type of medium with any existing infrastructure. Meaning booksellers advertise in one place, other artists mostly tend to advertise their work through social media. While books have historically been the main source of stories for film and TV recently podcasts, video games and other types have launched successful franchises.

  • Existing marketing sites are not tailored to how people in the film industry search for IP to adapt. They do not have sophisticated search features that would allow for buyers to search for themes, or types of roles for actors to play. We found in our research with industry types that these are the most important factors in how they look for IP to adapt.


Primary Research

Surveys

We sent surveys to 1,200 people in the publishing industry, 1,000 people in the entertainment industry and 400 people involved in work in other mediums.

User Interviews

We recruited users from our email surveys for more in-depth discussions of the process of buying and selling IP. We spoke with seven people from the publishing industry and eight people from the entertainment industry. They were between the ages of 28 and 53.

“Literally anything can be IP. The Slap is now IP”
— Entertainment Industry Professional on the breadth of IP they are searching for.
“They don’t always love to read, nor are they always interested in nuance”
— A Publishing Industry Professional on People who work in the Entertainment Industry
“Knowing who to contact, getting interest, knowing what current trends are”
— A Publishing Industry Professional on their biggest challenges
 

Personas

Using the information we gathered from our surveys and user interviews we created personas of our most likely buyers and sellers of IP. They are used exclusively using quotes from the interviews or surveys. The persona types were created based on matrices of profession and status. We were focused on recruiting “Hard users” so we wanted be able to identify the needs of high level creators and entertainment industry professionals but also mid-tier users as well.

We created personas for high and mid-tier producers, screenwriters and actors as well as best-selling authors and published authors who had not written a best seller.

A persona of a mid-tier screenwriter


Goals

Creator Goals

  • Show off their work to the right entertainment industry professional who will be able to get their work adapted.

  • Be able to field multiple offers to option their work.

  • Make money.

Industry Professional Goals

  • Be able to quickly search through quality material for something they will be passionate about making.

  • Quickly find work with specific story elements like “Female Lead”, ‘Horror/Sci-Fi” or “Mistaken Identity”.

  • Find material beyond books to adapt.

Business Goals

  • Become the leading marketplace for intellectual property.

  • Create first-class branding and UI to position ourselves as the best in class.

  • Quickly grow roster of creators to make the marketplace appealing to industry professionals.

Architecture

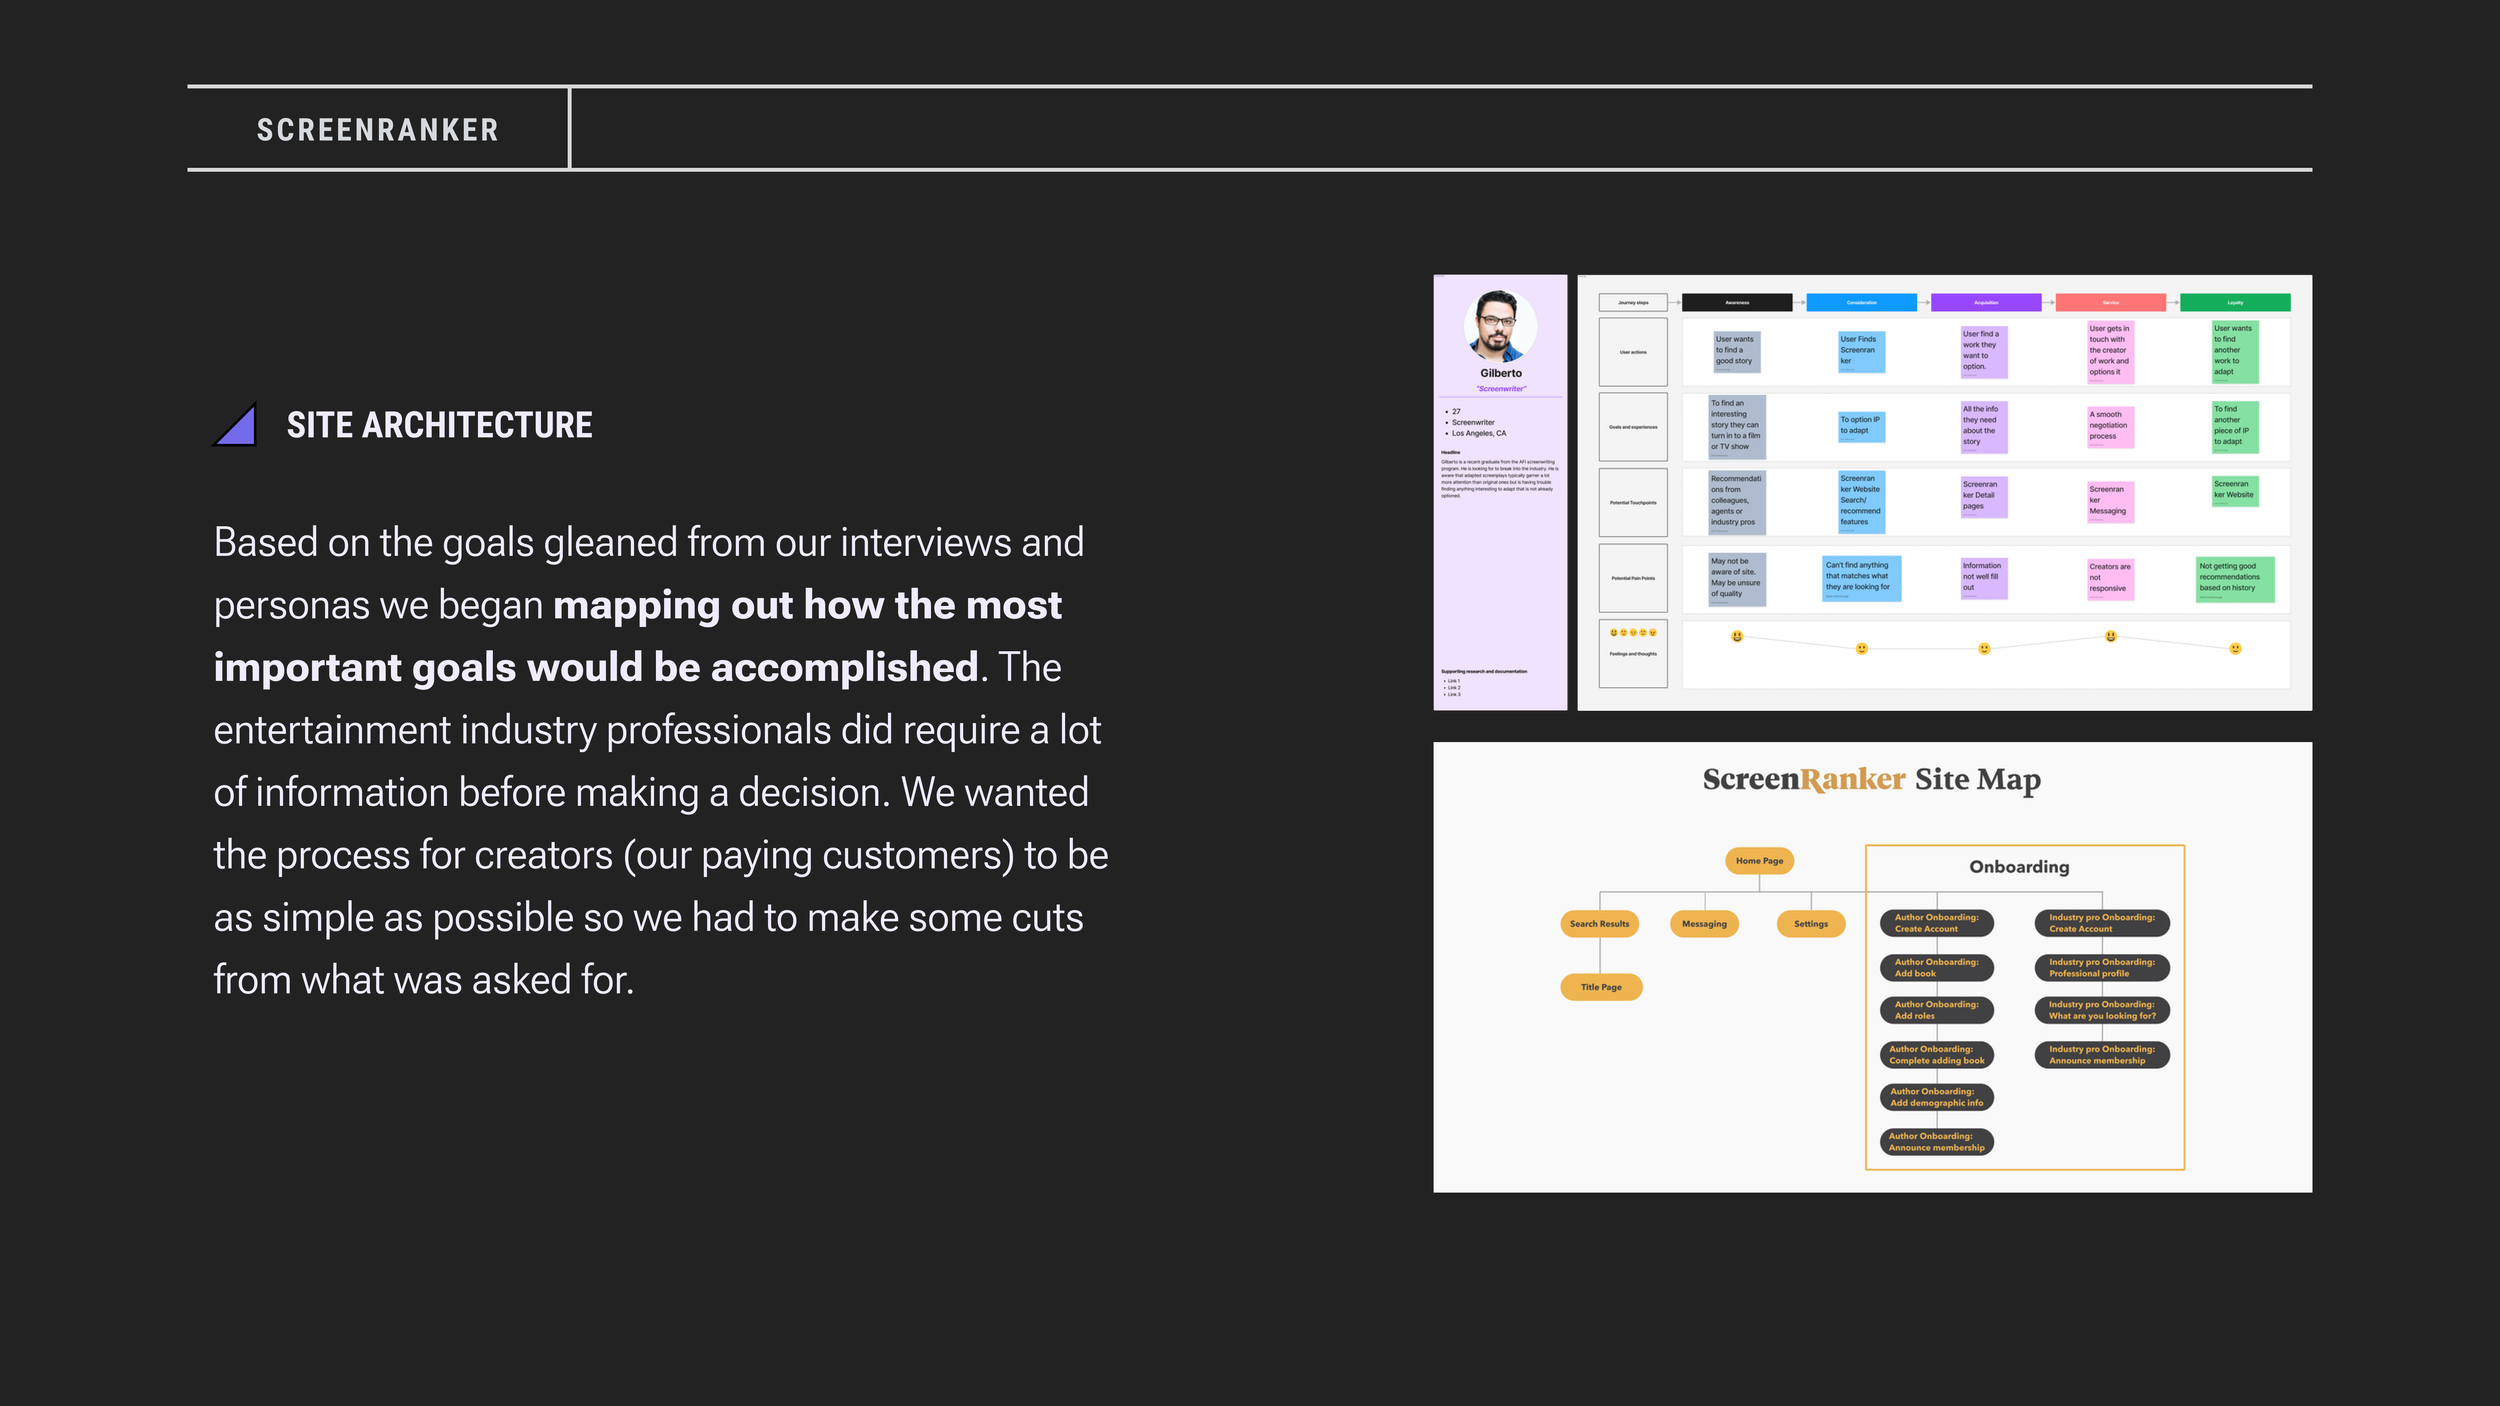
Based on the goals gleaned from our interviews and personas we began mapping out how the most important goals would be accomplished. The entertainment industry professionals did require a lot of information before making a decision. We wanted the process for creators (our paying customers) to be as simple as possible so we had to make some cuts from what was asked for.

Screenranker Site Map


User Flow for mid-tier screenwriter


Feature Set

Once we had the user and business goals in place and before we began designing we worked with our technical team to devise a feature set which would address all the goals we had in place on each page.

Screenranker Feature Set


Wireframes

We created wireframes to help us test out different versions/iterations before moving on to the visual design.


Usability testing

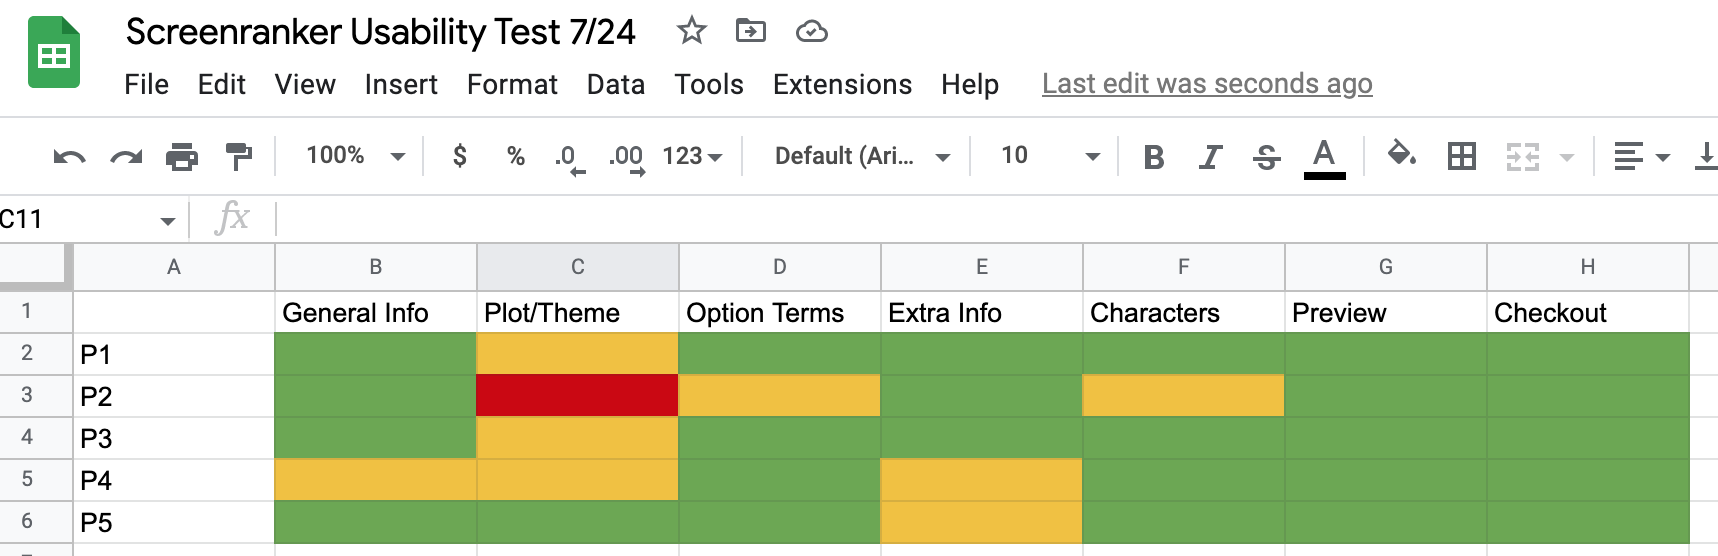
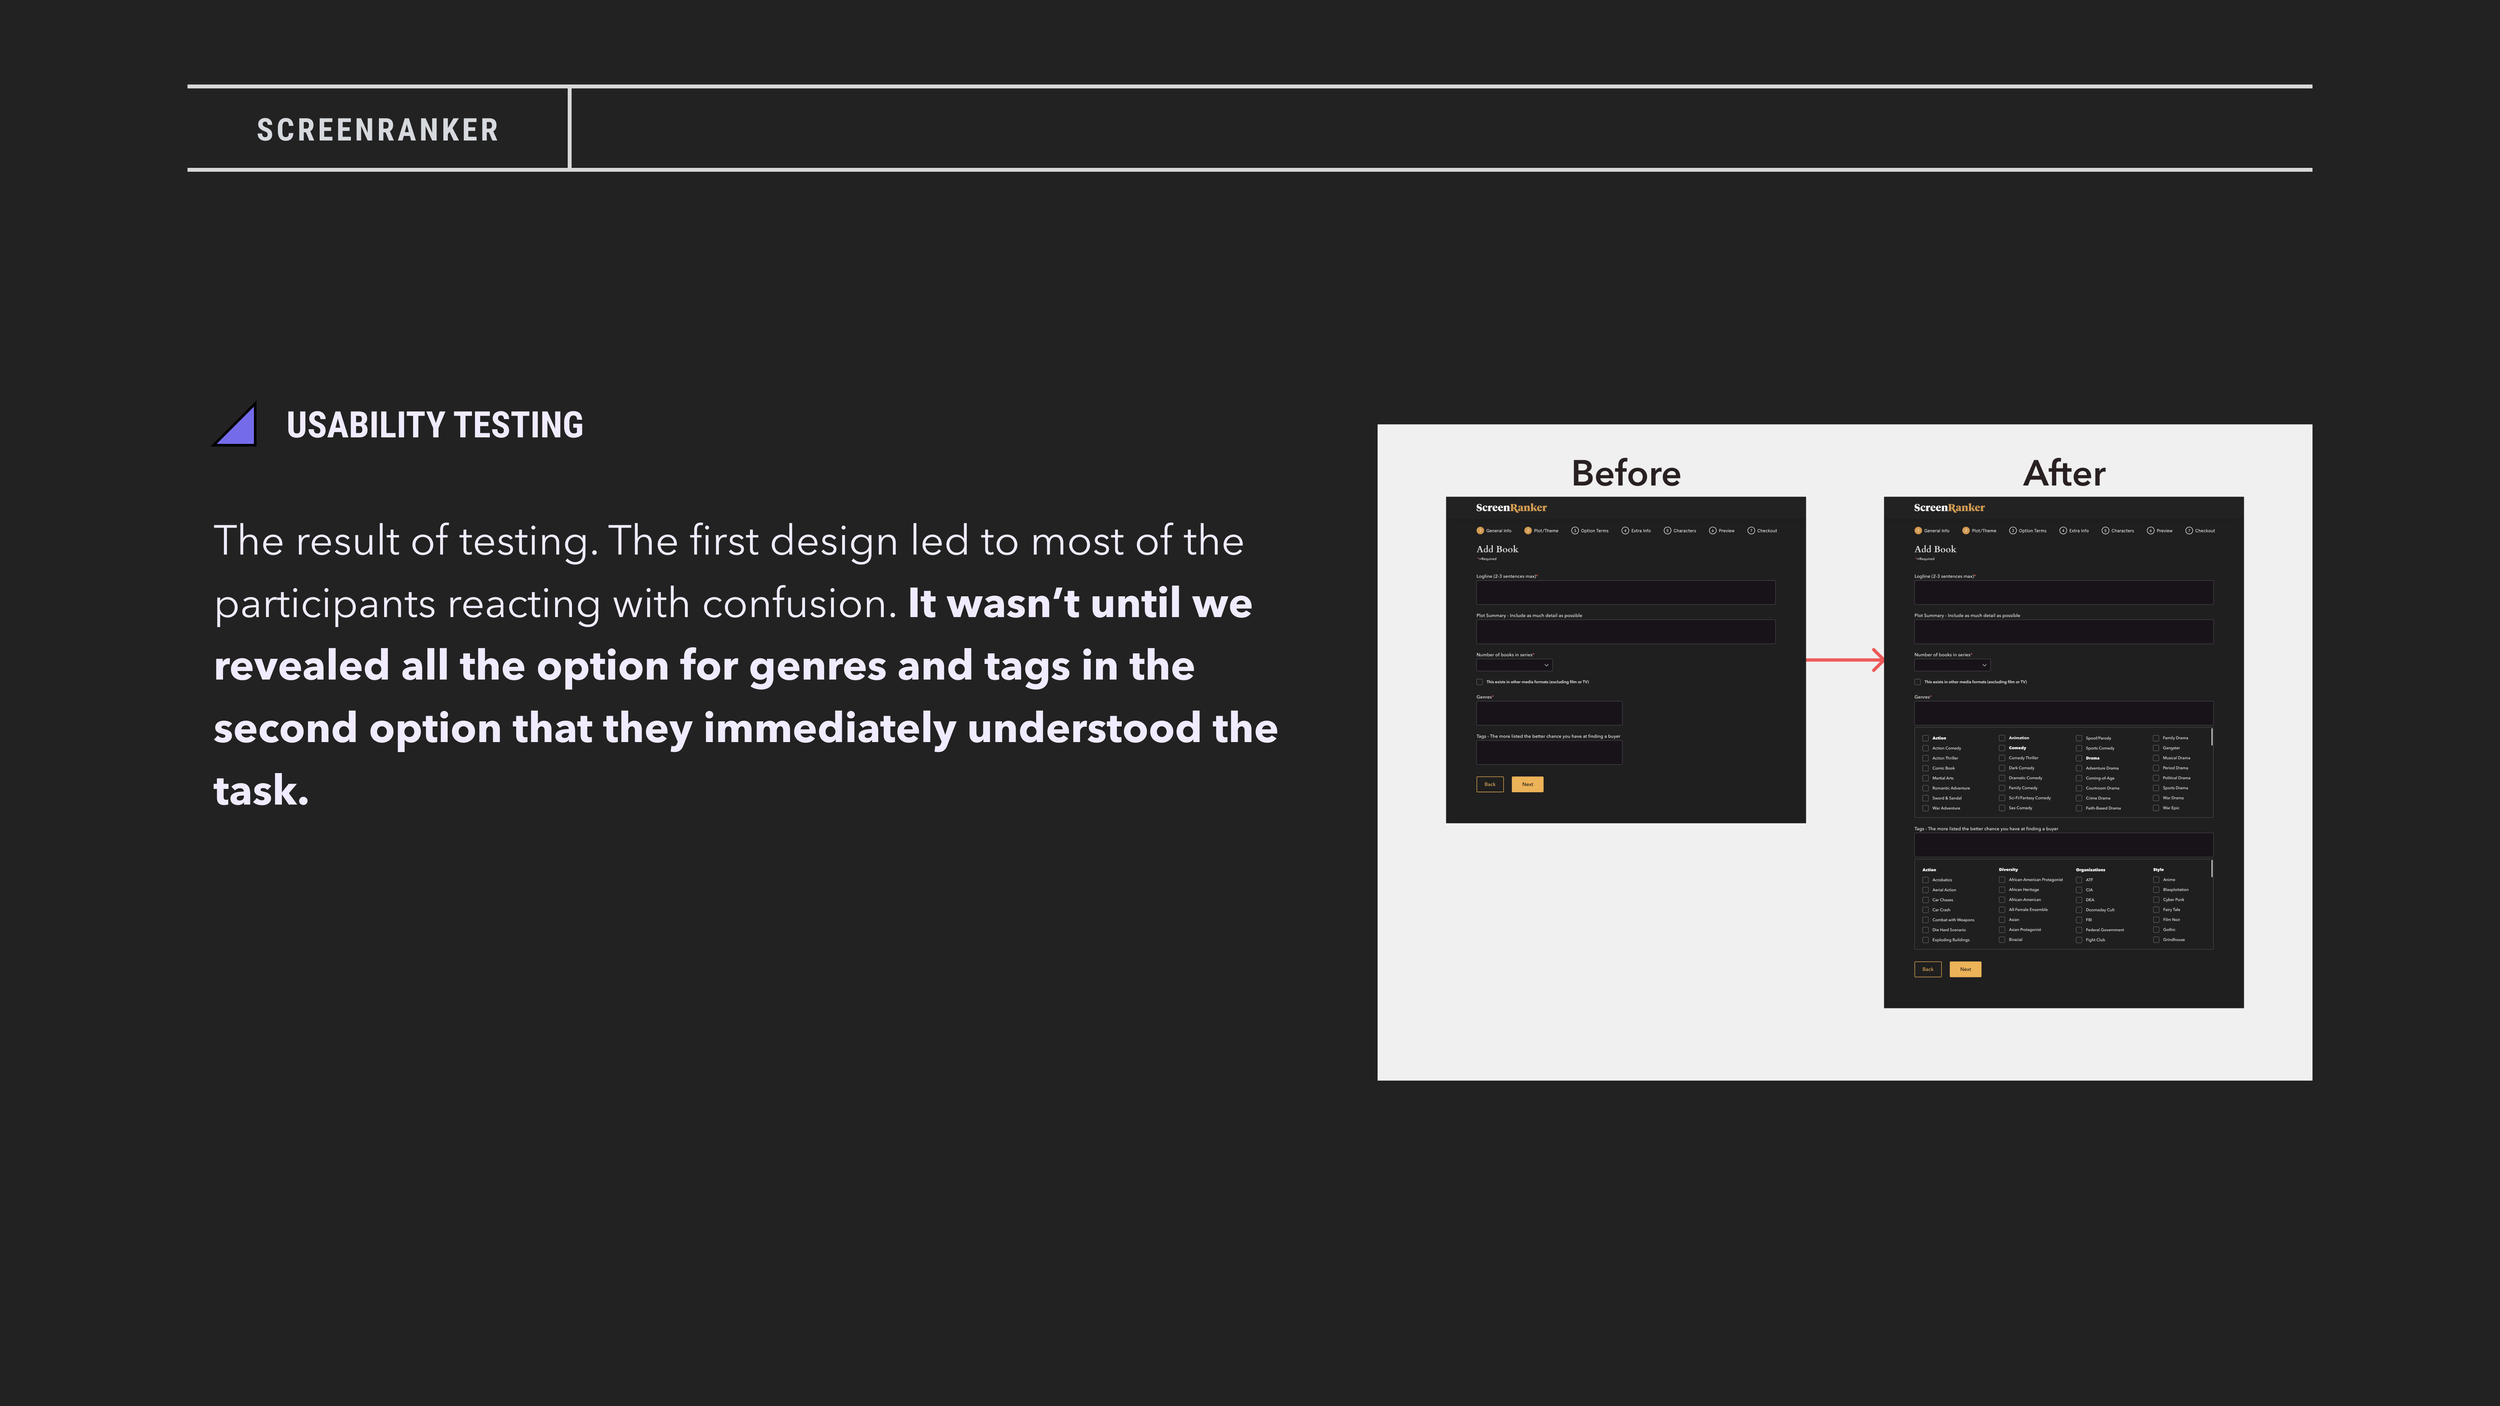
We conducted three rounds of usability testing focusing on the onboarding process which is the most complex part of the site. The initial areas where users had difficulty getting through the flow was mainly on the Plot/Theme page with our design for picking multiple genres and tags to add to their work. In the first round only one participant out of five was able to easily complete the task while three had some diffficulty and one could not complete it. After some redesign and several more rounds of testing we had a session where four out of five participants were able to get through it easily and one completed it with some difficulty.

The results from our first round of testing


The result of testing. The first design led to most of the participants reacting with confusion. It wasn’t until we revealed all the option for genres and tags in the second option that they immediately understood the task.


UI Designs

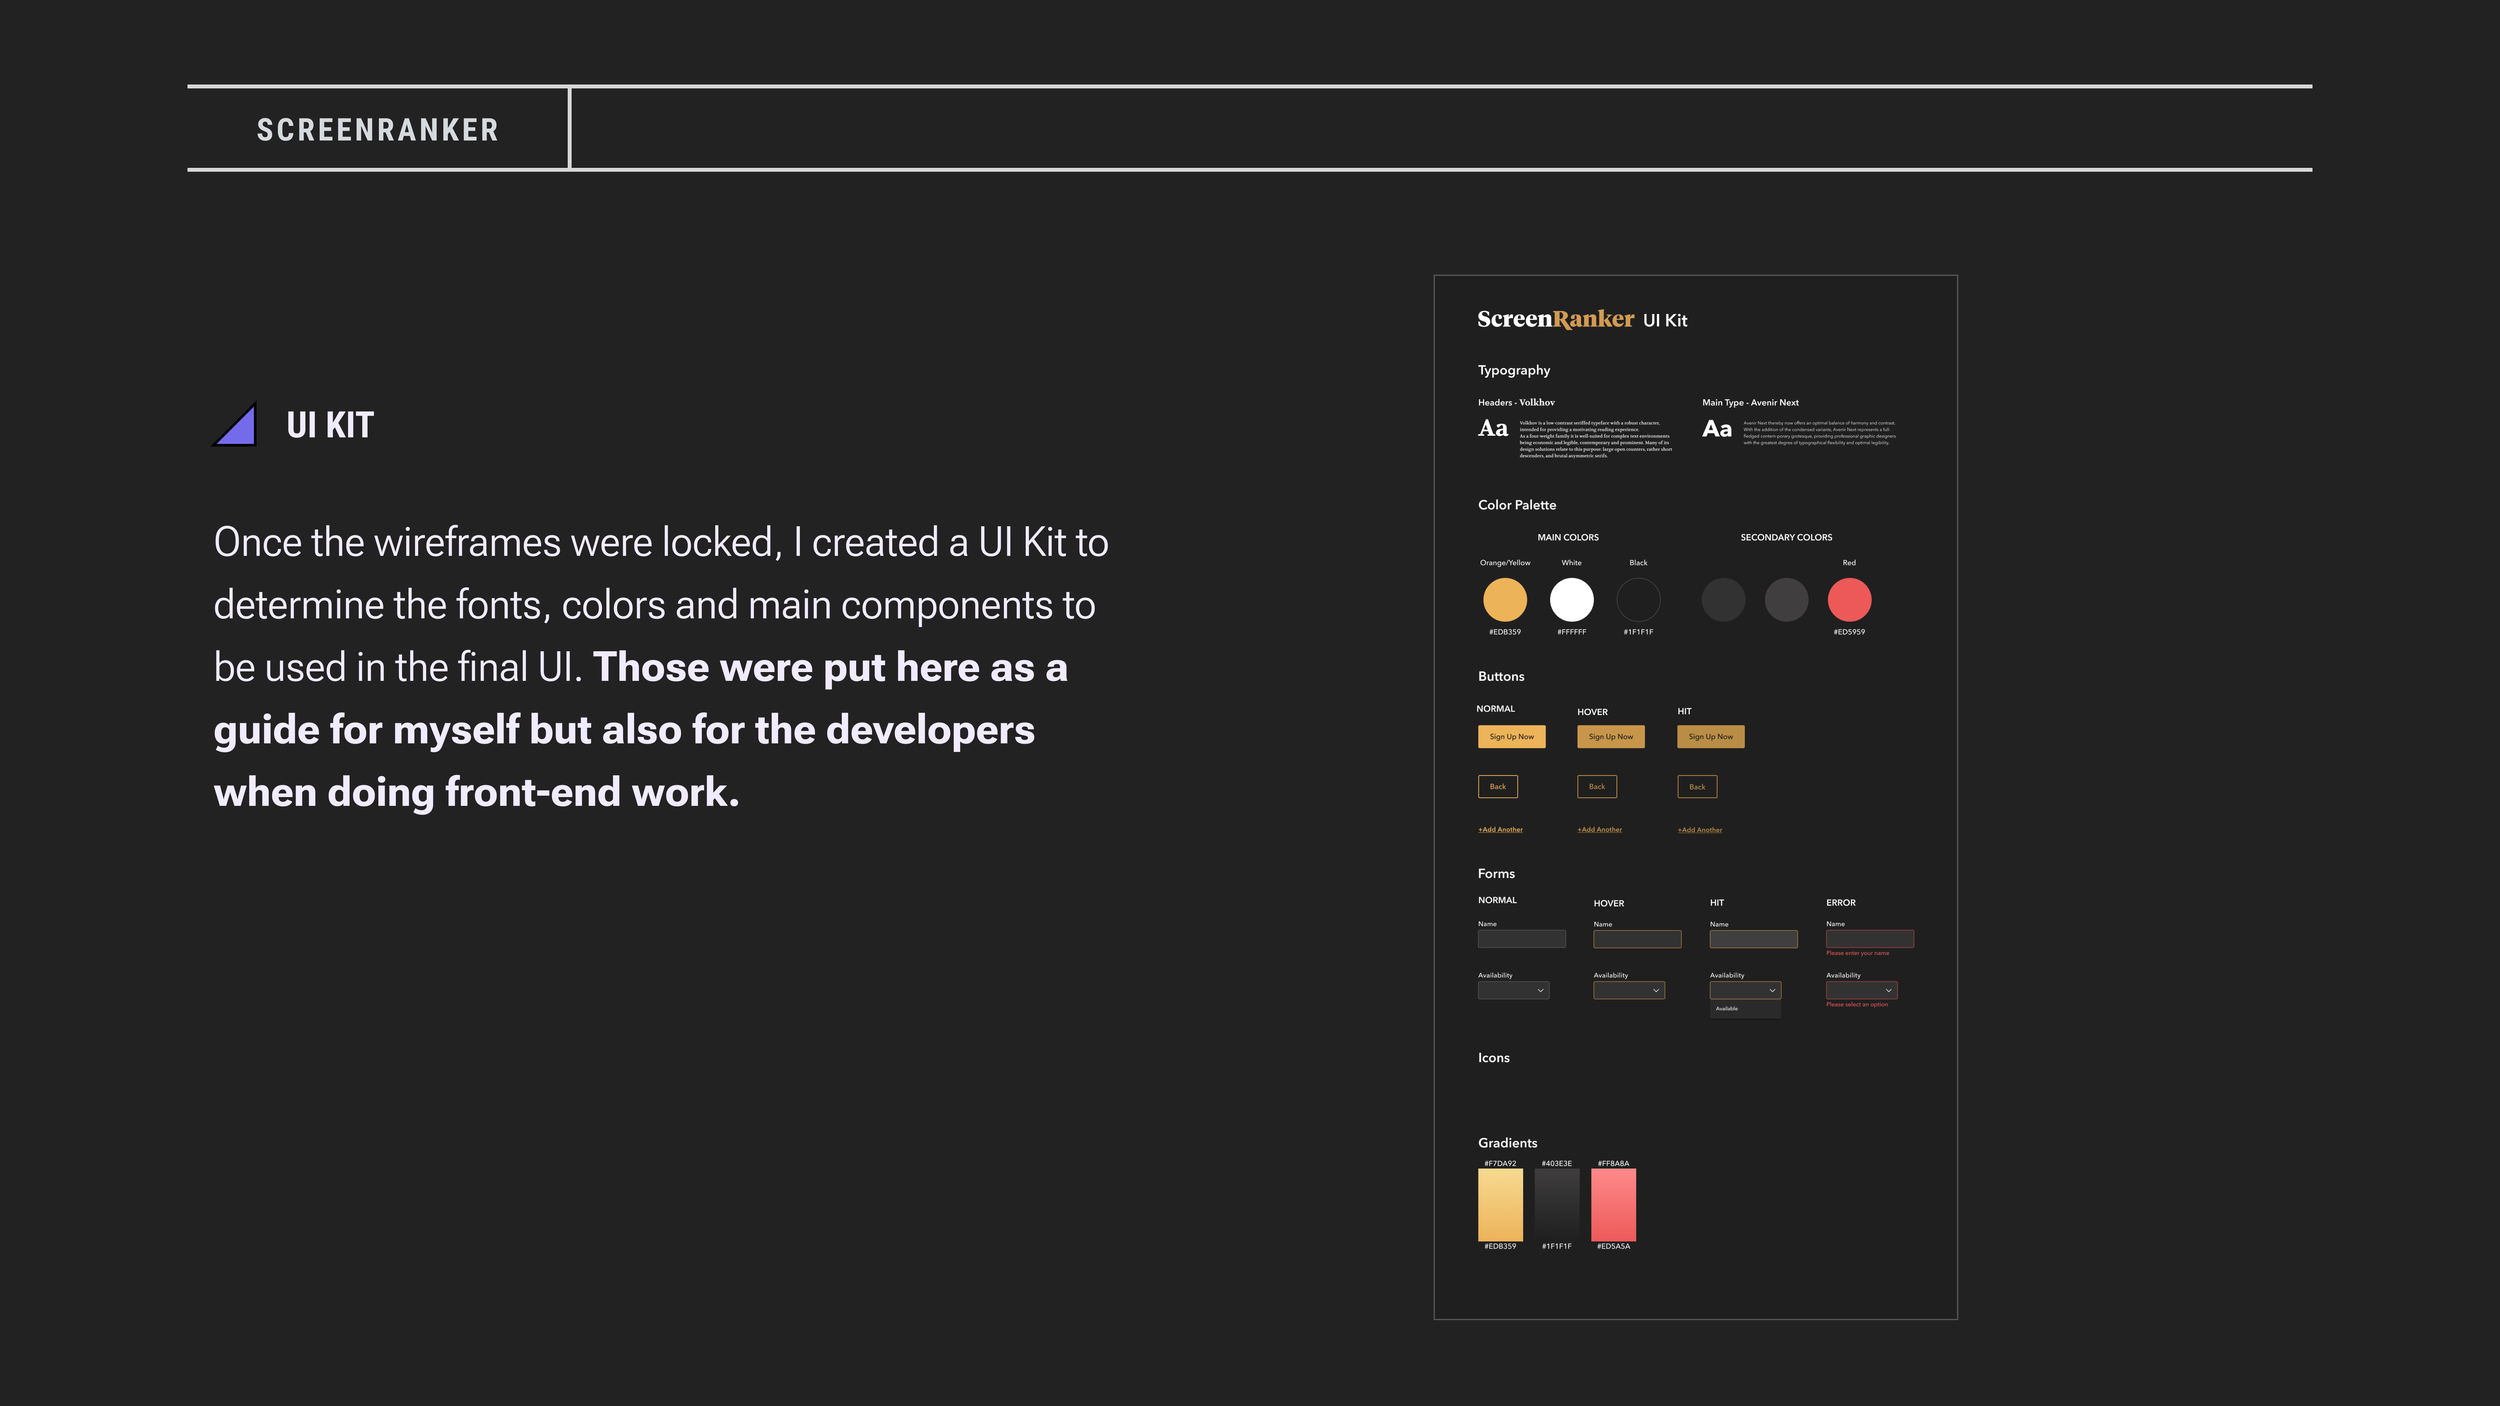
UI Kit

The UI Kit for guiding the design system


Final UI Designs


Next Steps

Screenranker is due to launch in Q3 of 2023. Some of the next steps will be adding important features like a recommendation engine that was not deemed feasible for the time constraints.

On launch, the most important KPIs to track are:

  • Conversion rate through the onboarding process.

  • Customer retention.

  • The amount of users communicating with one another to purchase IP. Measured by number of messages initiating conversations between buyers and sellers.

Each KPI has analytics set up to track it. Iterations will be made based upon the findings.

Homeworks Energy

Objective 

We were charged with increasing the conversion rate of the sign up flow for home energy assessments. Homeworks Energy is a company that makes most of its money through inspecting homes and advising homeowners on how to make their homes more energy efficient. The monthly average was around 45% .

The initial design

analytics

  • Before the project began, there were no tools in place to measure the success of the online scheduler. No one was sure what the overall conversion rate was, much less the conversion rate of each individual page.

  • My first step was to implement Google Analytics to measure the amount of users on each page of the sign-up flow. Analytics would give us a picture of the 10,000 foot view of what was happening in the checkout flow.

  • It was clear that the contact info page was the page where we lost the most customers. The conversion of the contact info page was only around 60%, compared to the others that were 80-90%.


The conversion rate for each page when we began the project


Session recording

I analyzed over 600 real session recordings of users attempting to sign up for a home energy assessment. The goal was to discover where the most users were giving up or encountering difficulties. 

  • I found that most people were giving up on the contact info page before answering any questions. What I gathered from the session recording and the heuristic analysis was that users found the page overwhelming. They would simply look at the page and end the session.

  • The second biggest problem on the contact info page was the address field. It appeared that the Chrome autofill feature was blocking our autocomplete feature and users were getting frustrated and giving up.

  • Other notable issues noticed were poor error handling, Users were not being taken back up the page to incomplete or incorrectly filled out fields after clicking the “Next” button. The size of the buttons for heating type on the eligibility page were also causing issues for mobile users.  

A screenshot of how we observed the session recordings

heuristic analysis

I analyzed each element of the UI. I used both research from sources like Baymard and NNGroup as well as observations learned on the job. 

You can see all of my comments in the image below. Some of the big themes I noticed were the overly wordy phrasing of questions, not indicating which questions were mandatory vs. optional, gray text fields that appeared disabled and some colors used that were not accessible to colorblind users. 

Using the findings from our research I made a user journey map (seen below) where I outlined all the good and bad points of going through the flow. 

Some of the top issues were:

  • Gray text fields that looked like they were inactive and made the page overwhelming.

  • Copy that was not easily scannable. Text fields were labeled as “What is your first name?” instead of “First name”.

  • Several questions turned out to be unnecessary after an internal review.

Analysis of the old design of the Contact Info page

user research

I wanted to learn about who the users were exactly so we could make sure we were still catering to them. All the users were homeowners that tended to skew age 50+. A strong majority of them were using desktop, about 70% while ~28% used mobile and only ~2% used tablets. Knowing that older customers tend to be less tech-savvy, this made us focus on simplifying the flow even more.

Journey map for the workflow

internal research

Since our biggest goal was to simplify the UI as much as possible, we wanted to remove all unnecessary questions. This required talking to all the internal departments at Homeworks to ensure we were not losing any crucial information. After talking with members of the marketing, sales and operations departments we learned what we were able to remove, which was substantial, though not quite as much as I had assumed. Some questions which I had assumed would not be important turned out to be crucial for certain departments.

Design

When I got to the design the biggest focus was on simplicity and making the design more accessible to all users. Based on our internal interviews we eliminated as many questions as we could, simplified the phrasing of the questions, improved the error handling and made the pages less visually overwhelming.

A small portion of the full user flow

I created the new designs in Figma with a prototype and full user flow (seen below) to ensure the developers would have a reference for how the product should behave. 

Before and after designs for the eligibility page. The main goal was to make the page easier to use on mobile.

We conducted several usability tests of the new designs to make sure that we were not introducing any new usability issues into the flow. We were comfortable concluding that we were not introducing anything that would confuse users. 

Before and after designs of the Contact Info page. The improved design yielded a 55% increase in conversion rate.

results

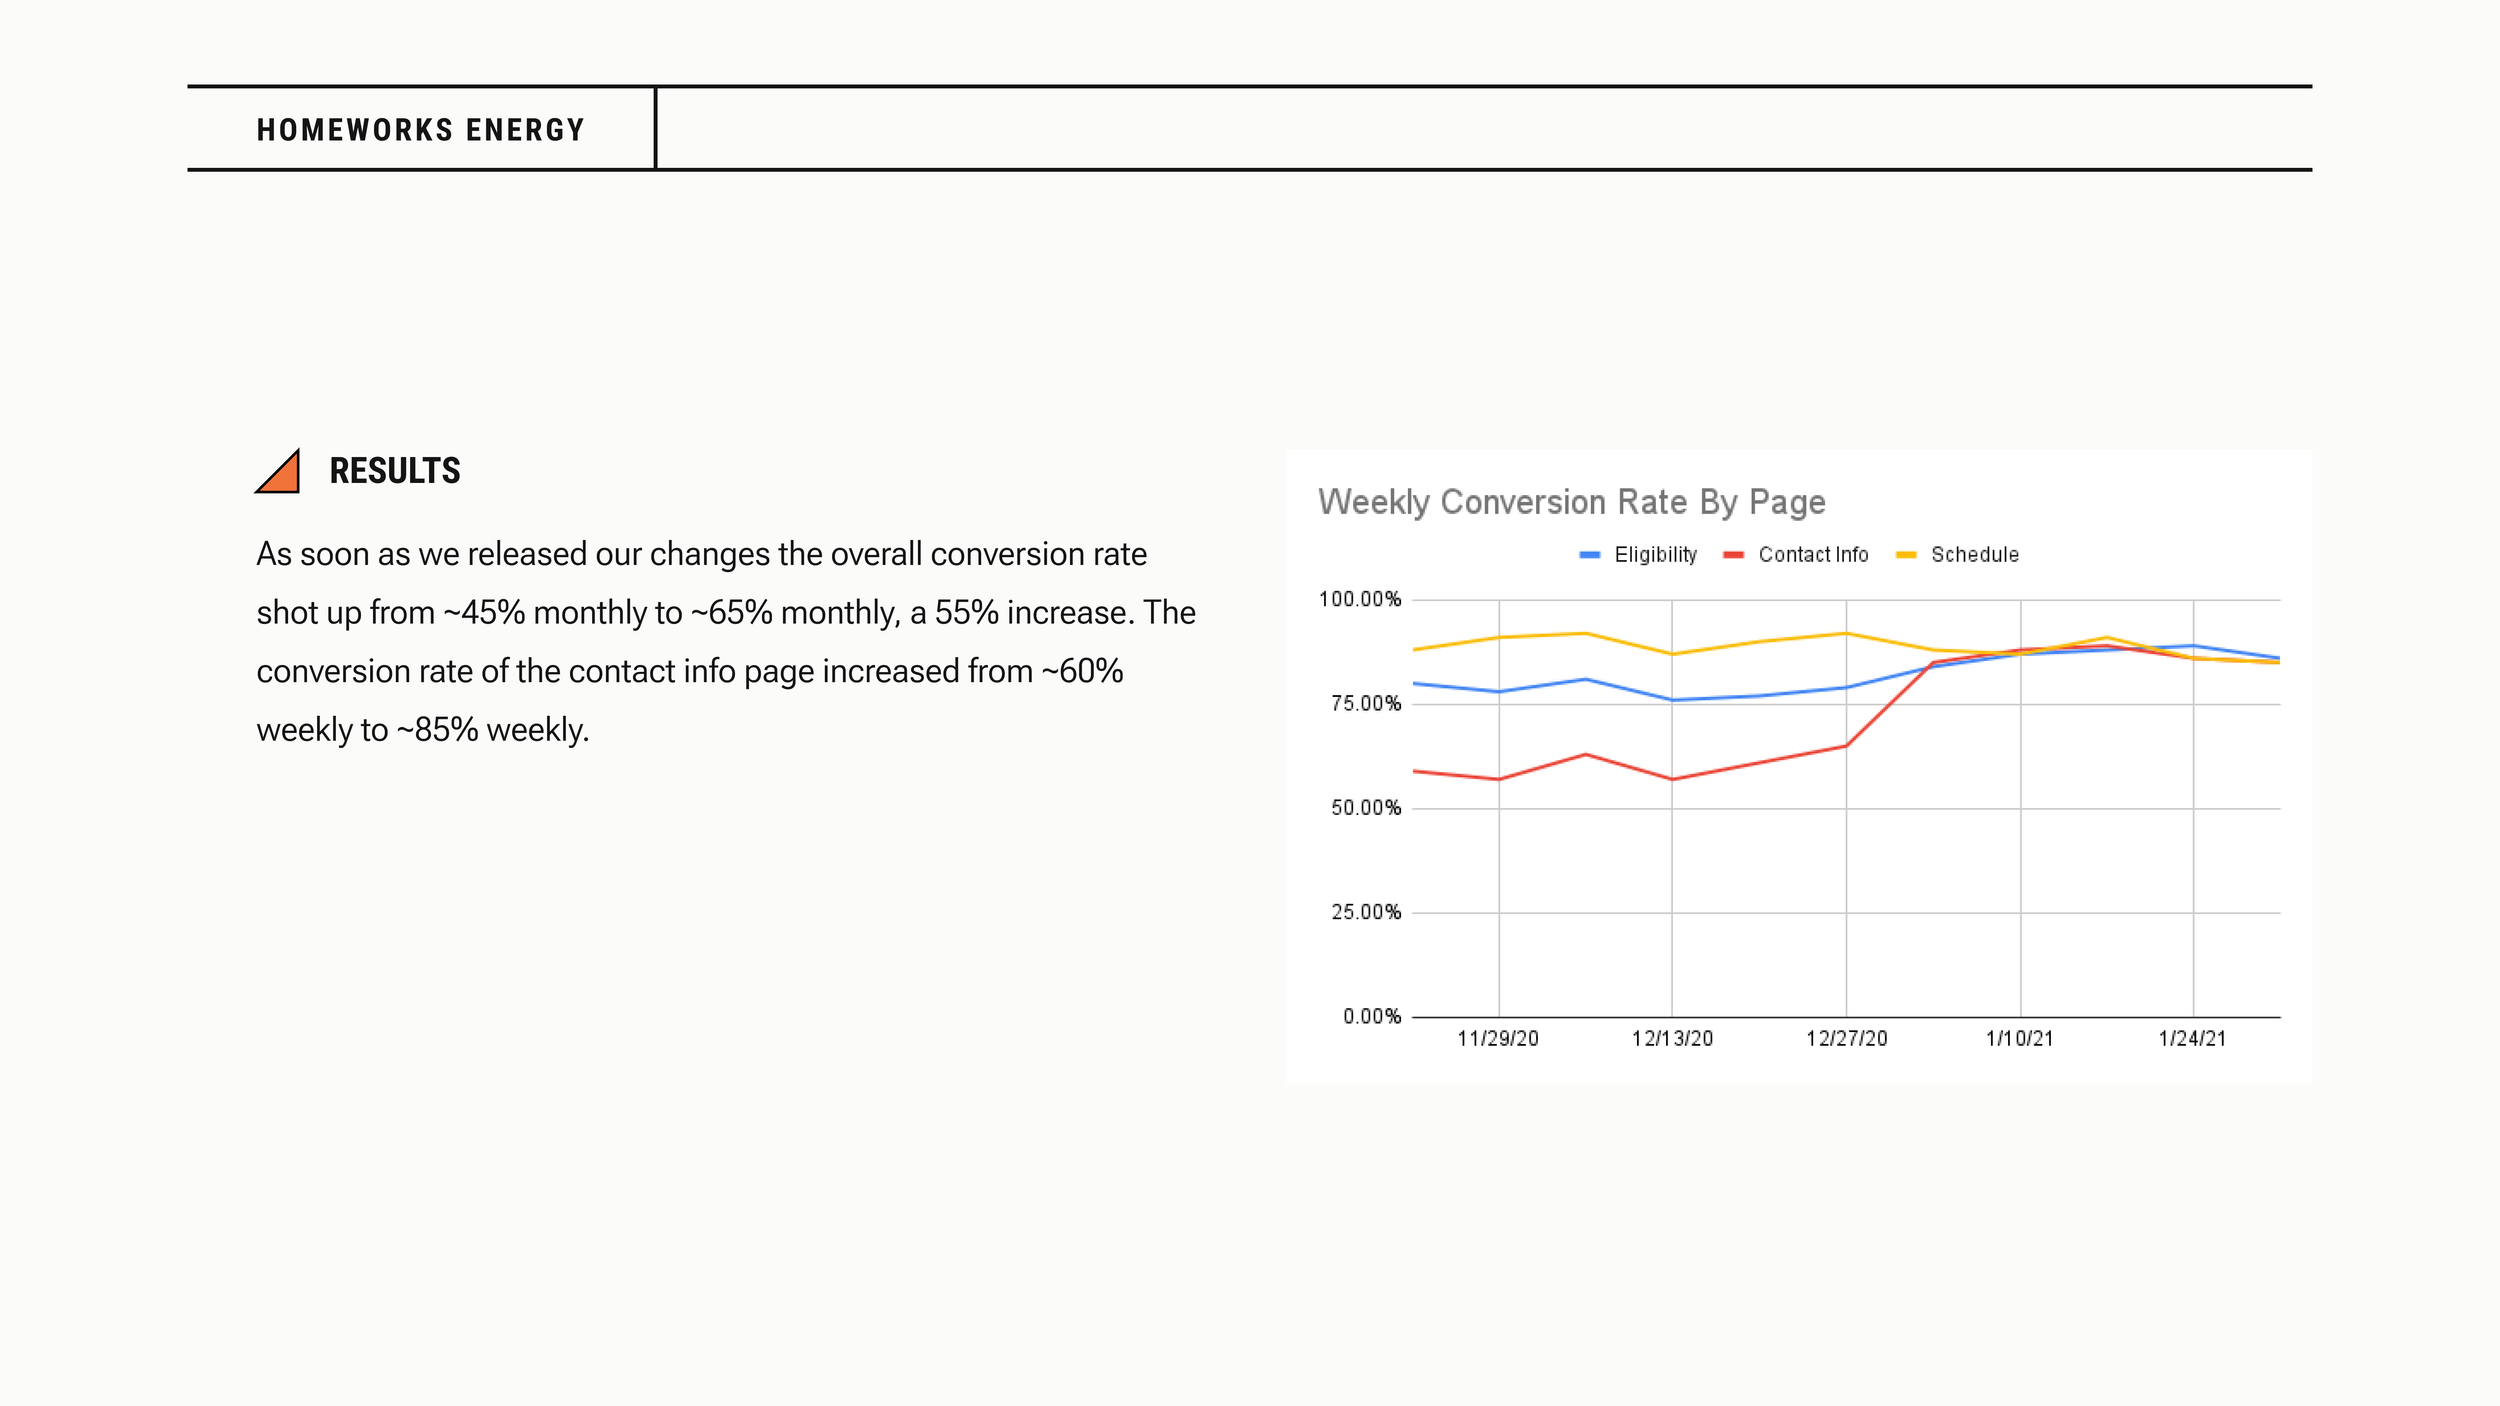
As soon as we released our changes the overall conversion rate shot up from ~45% monthly to ~65% monthly, a 55% increase. The conversion rate of the contact info page increased from ~60% weekly to ~85% weekly. 


Weekly conversion by page before and after our changes were released. Results remained consistently higher in the months after


next steps

Once we solved these problems, other ones cropped up. There was a bug on the schedule page that occurred for some users that had not been apparent before and which customers were within service range needed to be corrected as we experienced some issues there.

There were some factors I was interested to see get A/B tested. For instance, changing the fields from gray to white was a source of controversy. I wanted to make sure we were making the right decision and used Google Optimize to A/B test the field color. Over the course of one month the white fields performed ~12% better than the gray fields. Once we had enough data we were confident we could switch over to white fields entirely.

The changes were an overwhelming success. Once the changes for Home Energy Assessments had been released we went to work on increasing the conversion rate for HVAC Sales. When we implemented similar changes using the same practices as before we increased the overall conversion rate from 24% to 55%, an 129% increase.


Gradebook Project

My first project at itslearning was improving the gradebook.  Gradebook usage was low in the US and the company was losing out on tenders because the gradebook was not working for teachers.

The first question we faced was, why don't teachers in the US like the gradebook? Just from looking at it we had some assumptions but we wanted to confirm those and figure out better solutions.


An image of the old gradebook with an example of the clunky workflow.


We talked to as many customers as we could. We conducted remote sessions and flew to districts over in Texas and Indiana to talk to teachers in person.   We conducted user interviews with teacher, students and admins to get a good perspective of the challenges that each group faces. We made sure they brought their computers with them so they could show us exactly what they were talking about. We were conscious that what users say does not always reflect their behavior so being able to show us how they use the platform was important.

Our main findings were that the gradebook did not allow teachers to edit their grades easily enough, they had a difficult time identifying which students were most in need of intervention and that it was a pain to transfer all of the grades into the student information system, the final destination for grades.

You can get a more detailed look at what we found in our research summary here.

 
Cover page for our research summary. Take a look at the summary.

Cover page for our research summary. Take a closer look here.


Design Iteration

Early wireframe of the improved gradebook.

  • The priorities were to make it easier for teachers to add or edit a grade and to remove the excessive and confusing number of options at the top of the screen. We checked usage tracking and checked feedback to figure out which controls were the least used. Most of the options within the “Action” dropdown were not well used, which may have been due to the vagueness of the label.

  • It was important to allow teachers to quickly add and edit grades as well as exempt students, label work as late or forgive lateness. Initially, the design also included a way for teachers to leave a comment on work from the gradebook. Although teachers likely would have liked this feature based on our user interviews the team was never able to implement a comment feature. The visuals were also updated to better reflect itslearning’s new UI.

  • One of the challenges was the amount of options needed at the top of the screen. Legacy features that were still in use by customers made this necessary as well as maintaining consistency with other pages in the platform. We knew teachers wanted to see as much information as possible in one view. I believed it important to allow teachers to scroll down to the bottom of the page and have the top row remain in view so teachers know which assessments they are viewing.


Usability testing


UI for batch grading. This feature ultimately ended up getting heavily modified due to usability testing results.

 
  • I visited several schools to conduct user testing sessions with teachers.  Teachers found the main workflows like grading, exempting and assigning work as late to be intuitive. 

  • The one area where we kept faltering in our tests was an area called batch grading.  One of our goals was to help teachers grade more quickly.  The batch grading feature allowed teachers to instantly grade a group of students which they could filter by course group or by assessment status (turned in late, overdue etc.).  

  • The problem we discovered was that teachers were confused because they didn't really need such a robust feature.  What they really needed was a way to quickly jolt their students who hadn't done their work.  Teachers wanted to give their students zeroes more quickly!  Teachers were reporting that up to 40% of their students would not hand in their work on time so a big part of their job was reminding those students to hurry up and turn it in. 

  • Learning this I made the decision that even though the UI for batch grading looked impressive it was too complex and unnecessary for what teachers actually needed to do.  Instead, we implemented the option "Ungraded = 0" into the menu for each assessment. This took care of the main use case and was relatively easy to implement.


UI Design


The final design for the gradebook


The design for the standards based version of the gradebook


The new design for the gradebook includes easy editing for grades on the page, a less cluttered toolbar, a way to add comments directly from the gradebook, indicators on which assignments have been turned in/are late, and reporting on how each student has fared throughout the term.


Results

When the new gradebook was released we measured the success through two indicators.

  • Is it still a roadblock in getting new customers?

  • How often does it come up as a favorite feature?

Previously, the gradebook had been mentioned as a major roadblock in getting new customers. It consistently came up as a reason why teachers did not like the platform. After the release, it was no longer seen as a roadblock to potential customers and existing customers who had grade passback began listing it as one of their favorite features in itslearning on our annual satisfaction surveys.


User Research


In my time at itslearning I implemented a number of UX research methodologies, both quantitative and qualitative. These included user interviews, usability testing, happiness surveys, and NPS surveys.


user interviews

I have conducted a large number of interviews with users of itslearning.


usability testing

Various usability testing projects for the organization


Surveys

I have run an analyzed both NPS and happiness surveys within the itslearning platform.


Pedalboxd: Building a Guitar Pedal Discovery & Management App

View on Github

View project

Project Overview

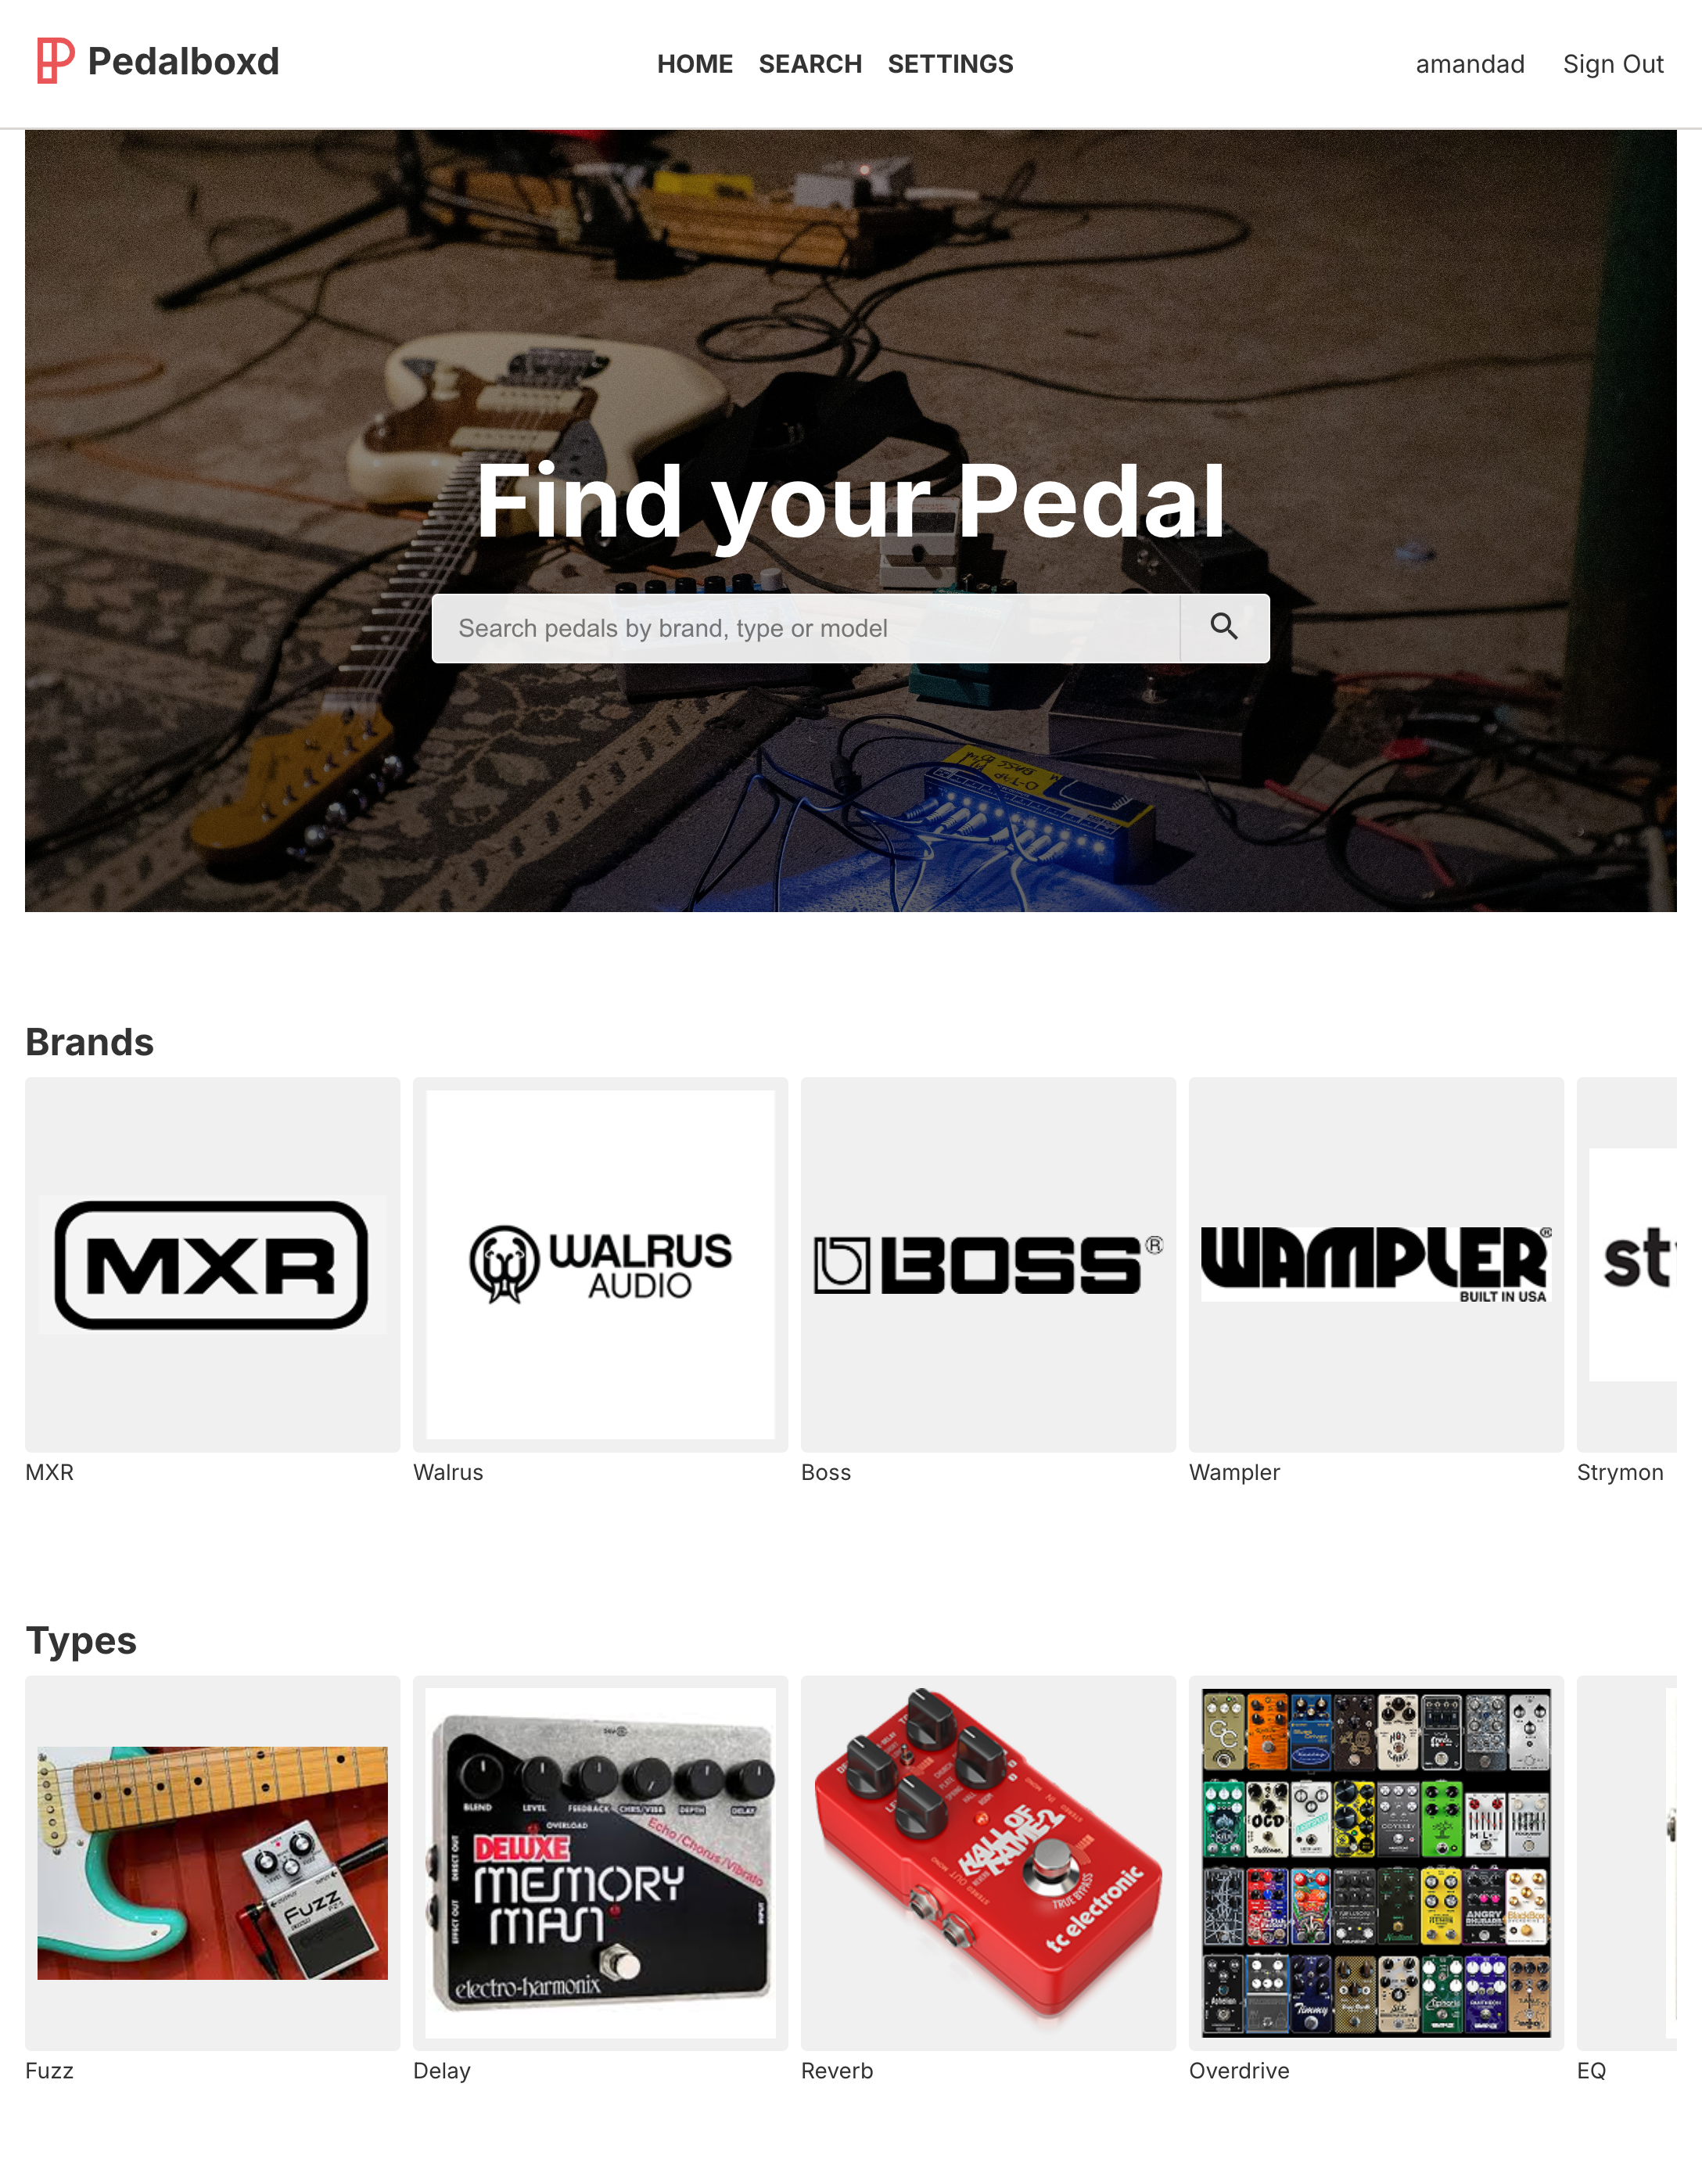
Pedalboxd is a web app that helps guitarists and bassists discover, compare, and manage their pedal collections. It combines a clean, responsive React front end with a flexible data-ingestion pipeline that pulls specs, images, and pricing from multiple pedal manufacturers (Wampler, TC Electronic, Death By Audio, JHS, and more).


My Role

  • UX Designer: Conducted competitor research, sketched wireframes & user flows, built interactive prototypes in Figma, and ran informal user tests.

  • React Developer: Architected and implemented the production UI with React (plus CSS Modules for component-scoped styling), integrated Firestore for user collections, and built data-scraping scripts to automate pedal data imports.


Key Challenges

  1. Data Consistency

    • Pedal specs, images, and pricing come from disparate sources (CSV exports, Shopify JSON APIs, custom REST endpoints).

    • Each brand uses different URL schemes, HTML structures, and field names.


  2. Scalable Import Pipeline

    • Need to add new brands over time without rewriting the scraper from scratch.

    • Must dedupe existing entries to avoid cluttering the database.


  3. Intuitive UX for Complex Lists

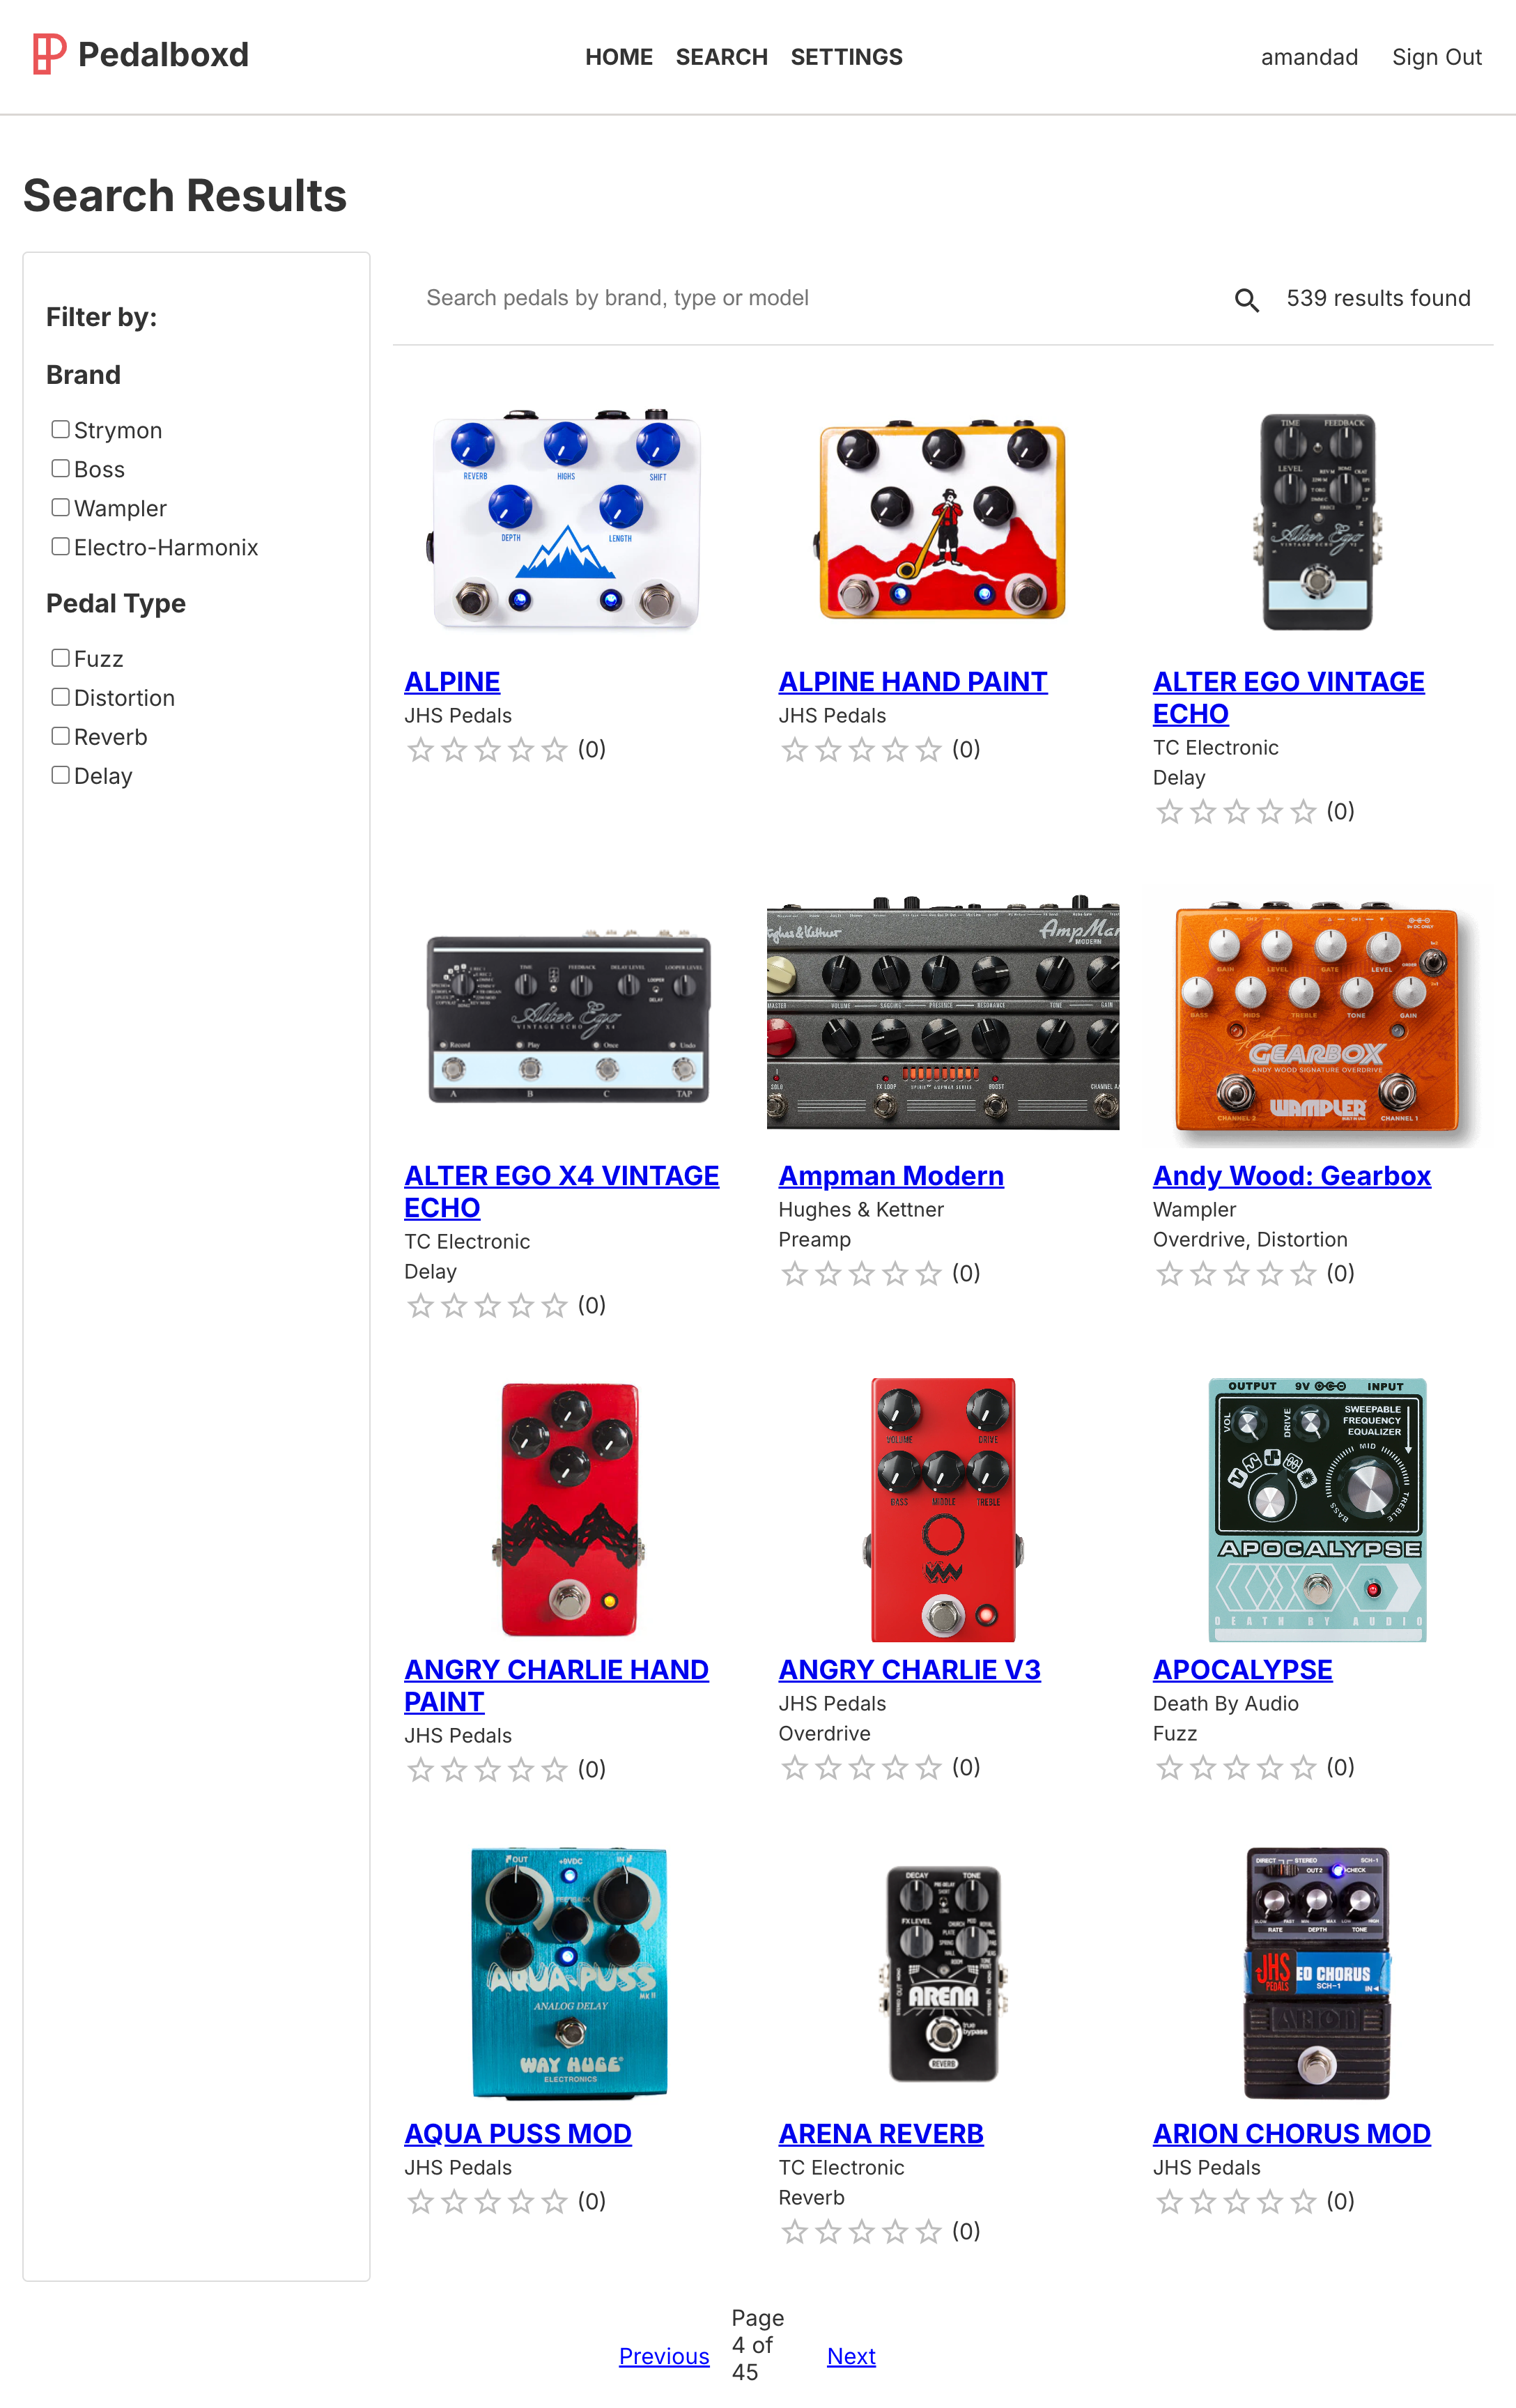
    • Users should be able to filter by type (e.g. Overdrive, Delay, Modulation), price range, and brand.

    • Provide a clear way to add/remove pedals from personal “boarding” collections.


UX Design Process

  1. Discovery & Research

    • Reviewed top guitar-gear sites (Reverb, Sweetwater) and competitor apps.

    • Interviewed hobbyist guitarists to understand how they track and discover pedals.


  2. User Flows & Wireframes

    • Mapped primary flows: browsing pedals, viewing details, saving to collection.

    • Sketched low-fi wireframes in Figma to explore layout, filtering controls, and card designs.


  3. Interactive Prototype & Testing

    • Built a clickable Figma prototype with core screens (Home, Pedal Details, My Board).

    • Ran 5 informal usability sessions, iterated on navigation (moved filters into a sticky sidebar) and pedal-card hierarchy (image, name, price, core specs).


Technical Implementation

Data Pipeline

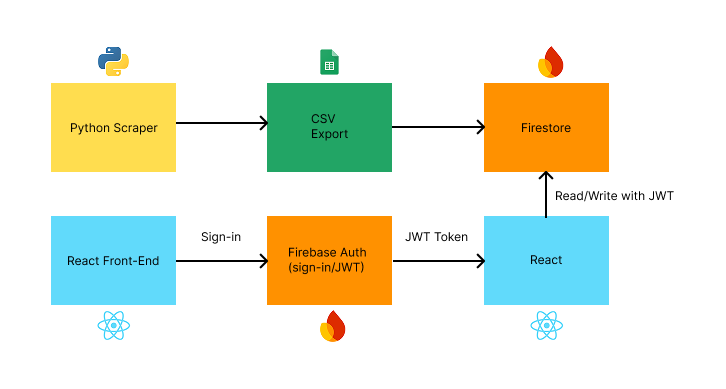
  • CSV Imports (for legacy brands):

    • Node.js scripts that parse vendor CSVs, normalize IDs, and upsert into Firestore—preventing duplicates by using consistent document IDs.


  • Python Scrapers (for modern Shopify catalogs):

    • TC Electronic: Hit their REST endpoint (/search/products-result), parsed JSON for modelCode, specs, and images.
    • Death By Audio & JHS:

      • Used Shopify’s public APIs (/products.json + /products/{handle}.json) to fetch full catalogs, extract body_html, price, and images.
      • Stripped HTML to plain text with BeautifulSoup’s get_text() for clean “Specs” fields.


  • Automation:

    • Stored scripts under scripts/ with requirements.txt and a virtual environment.

    • Added yarn scrape:tc and yarn scrape:db NPM scripts to rebuild data on-demand.

Front-End (React + CSS Modules)


  • Styling:

    • CSS Modules for encapsulated, component-level styles (no global leaks).

    • Used BEM conventions for any shared utility classes.

  • Component Library:

    • Custom React components: PedalCard, FilterPanel, Modal, etc.

    • Lucide-React icons for clear, scalable iconography.

  • State Management:

    • React Query for data fetching & caching; Context API for user auth/collections.

  • Filtering & Search:

    • Debounced free-text search across pedal names and specs.

    • Multi-select filters for Type, Brand, and Price bands.

  • Responsive Layout:

    • CSS Grid for the pedal-card gallery with media-queries to stack on mobile.

    • Modals for detail views on desktop, full-screen panels on mobile.

Outcome & Impact

  • Data Coverage: Automated import of 500+ pedals across 4 brands, with nightly scripts to catch new releases.

  • User Feedback: Beta testers praised the clean “Specs” formatting and fast filtering.

  • Next Steps:

    • Integrate user-submitted reviews & ratings.

    • Add “board” sharing and social features.

    • Explore a mobile app wrap with React Native.

Tech Stack

  • Front End:

    • React, CSS Modules, Lucide-React, React Query


  • Back End / Data:

    • Firebase Firestore, Node.js (CSV import), Python + BeautifulSoup (scrapers)

  • Tools:

    • Figma (wireframes & prototype), Git/GitHub, VS Code, Yarn/NPM scripts